Meet the Maker: Tens Studio

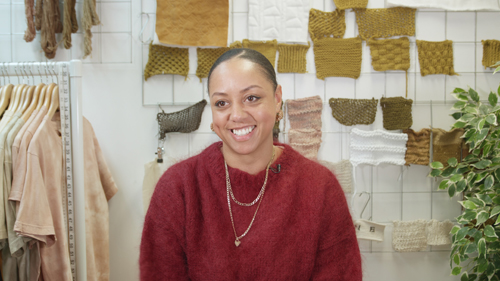
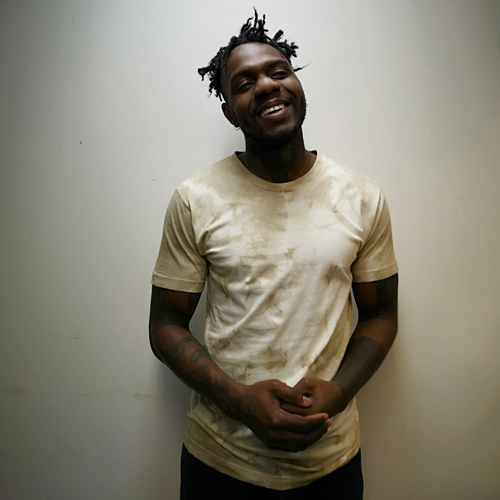
My name is Sam, I own a clothing brand called Tens Studio and I am a textile designer and artist. My work explores the visibility of my heritage and Black British history through sustainable handcrafted textiles.

Describe your dyeing process.

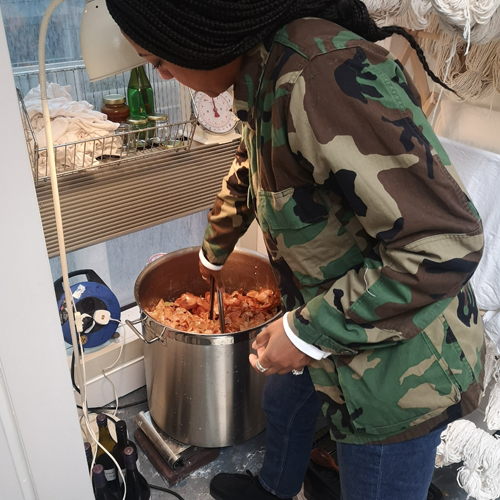
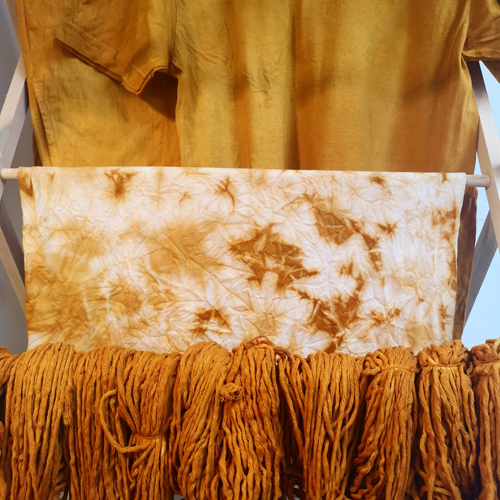
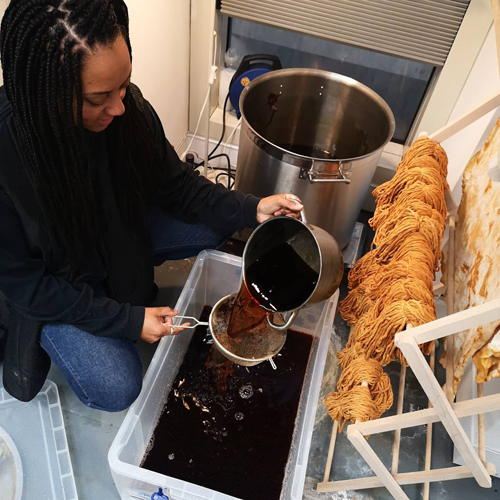
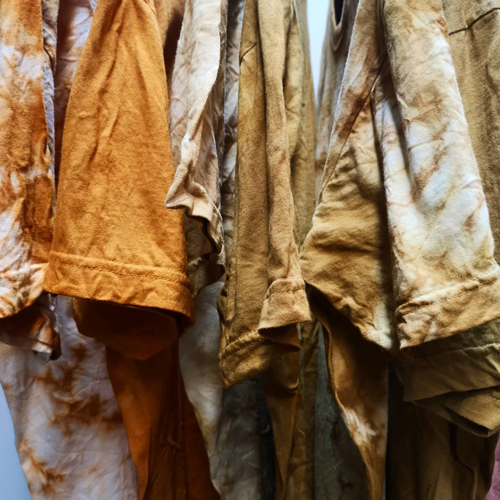
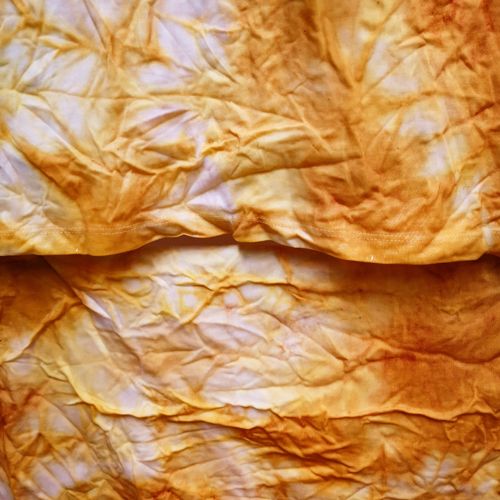
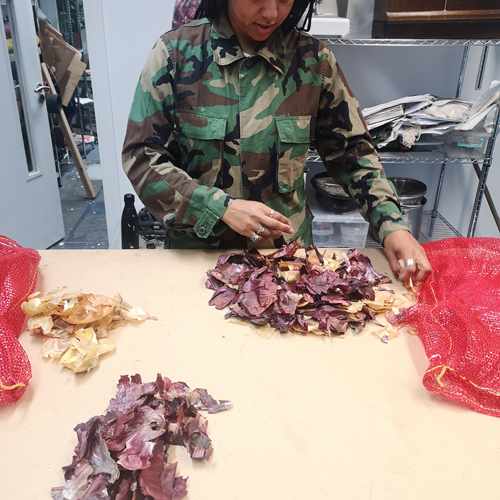
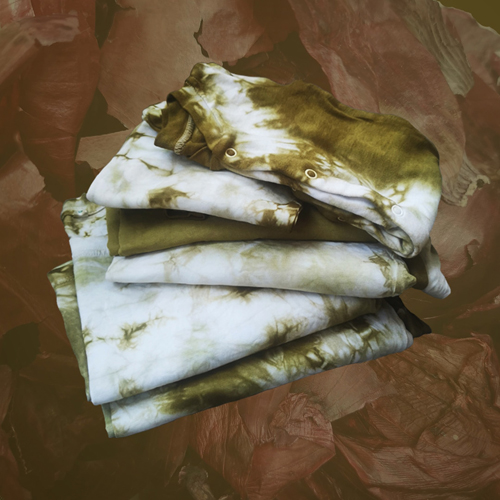
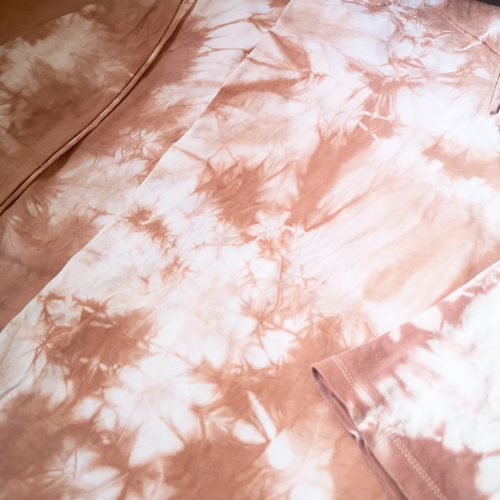
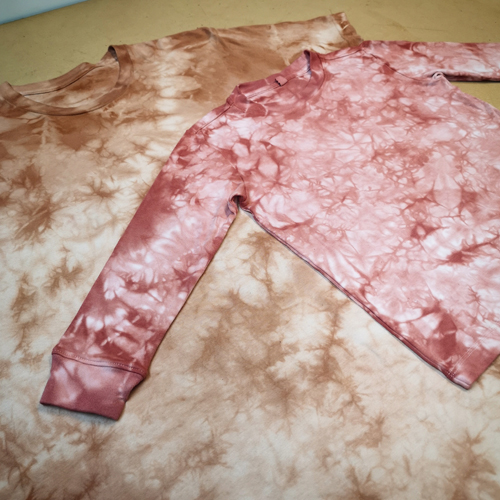
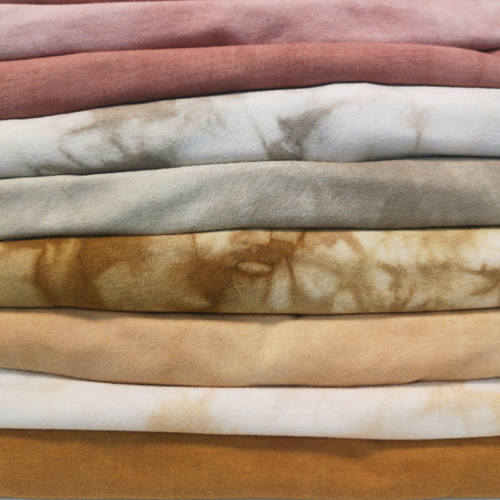
I make natural dyes using food waste such as onion and avocado skins. I have also made my own copper and iron modifiers which alter the tone of the dyes to produce a wider range of colours. I have been experimenting with pattern and tone with tie-dyeing techniques.

How and where did you learn to dye?

I learnt this process at home from Jenny Dean’s books during the first lockdown last year. I also got a lot of help from May Hands. The beginning stages of learning the process was quite daunting so it was nice to be able to ask her lots of questions! When learning something new, I always find I make a lot of mistakes and with the natural dyeing process, I have had to learn to let go and enjoy the process.

Why natural dyeing?

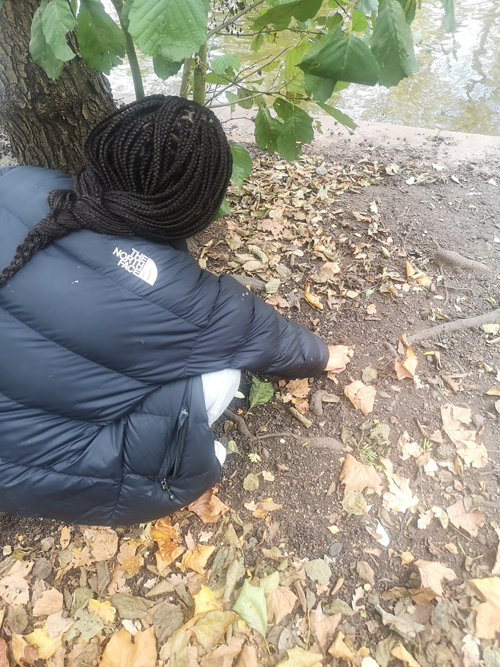
I wanted to try natural dyes for a while. I love the idea of going back to basics and using what you have in your immediate surroundings. I love saving food waste and foraging for things like alder cones and acorns in the park. When making your own copper and iron water you can see it start to work after a few weeks when the water changes colour, which is a really satisfying feeling. I find it all so interesting and I love the DIY aspect of it.
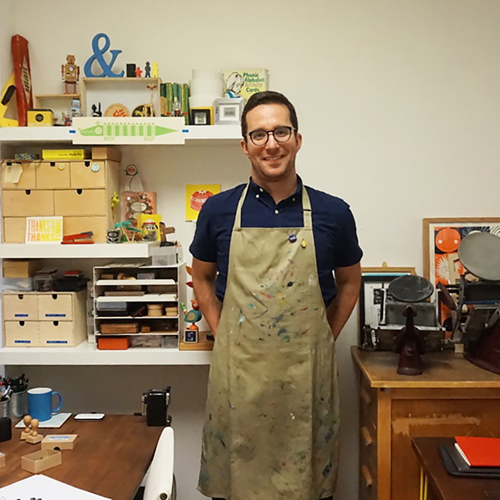
Where do you work?

I have a studio on Holborn Viaduct which is part of The Koppel Project so I am surrounded by lots of talented artists and makers.

Describe a typical day in your studio.

A typical day in my studio includes some part of the natural dyeing process. The process is quite long, lasting a few days so I’ve always got different buckets with different things going on in each of them. I’m always flitting between each step of the process throughout the day. Once I’ve used the dye bath I will reduce the liquid down to a pigment to use as an ink or to paint with. In between this I am doing admin or planning the completion of my new collection.

How long have you been natural dyeing?

I started natural dyeing during the first lockdown last year and I’ve been doing it every day since. I’m still amazed at how something that I used to throw away, like onion skins, has become so useful to me. I’ve got lots of friends and some Instagram followers saving their food waste for me to dye with.

What inspires you?

Nature and the stillness of the first lockdown inspired me to go back to basics and made me consider my impact as a designer on the planet. I am always inspired by Black history. Last year’s events, starting with the announcement that Black and brown people were 4 times likely to die from Coronavirus, despite this people were being sent back to work. This news angered me and led me to look at Black British activism during the ’70s; the British Black Panthers, the Mangrove 9 and key figures like Darcus Howe, Althea Jones Lacointe and Olive Morris. Looking at these activists and inspirational historical events gave me hope that grassroots activism can lead to change. A couple of months later George Floyd was murdered, the BLM movement resurged and the need for grassroots activism was more important than ever.

What is your favourite dye product?

Red onions skins are my favourite thing to dye with because they can produce a lovely deep green, my favourite colour. When you add iron water it turns the colour darker and can be described as a sadder tone. Add copper water and the colour turns a warmer shade. I love that these simple actions can develop new colour.

What have you made that you are most proud of?

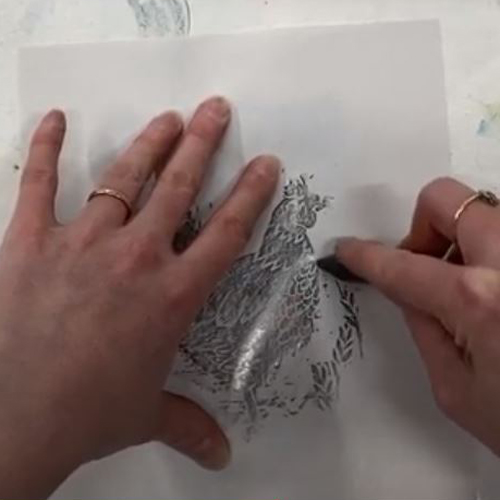
The patterns that come out of tie-dyeing with natural dyes are so beautiful, they look a bit like marble. My new year’s resolution is to make a quilt from hand-dyed pieces of fabric that I have collected over the year from each dye bath, I anticipate this will be my most proud creation!

Where can we see your work? Where do you sell?

You can see my work on my website, at the moment I sell there and on Instagram. This Spring I will be selling on a new platform for Black-owned brands called Ourhood Community. A percentage of the profits will go to supporting Black focused charities and community projects.

What will we be seeing from you next?

Next, I would like to try botanical dyeing with plants like nettle, ivy, eucalyptus and tagete flowers.

Do you have any advice for other printmakers and creatives?

My advice would be to experiment and explore as much as you can and learn new techniques. View creativity as self-care, something to use for your own wellbeing – not for anyone or anything else. Embrace constraints as opportunities rather than restrictions and use this chance to become self-sustainable, creating your own materials.

To see more of Sams work follow her on Instagram.

Meet the Maker: Alyn Smith

Hi, my name is Alyn, and I am a Cardiff-based Illustrator and Printmaker. I use low-tech print processes, alongside digital technology, to create positive and colourful images.

Describe your printmaking process.

Everything starts in my sketchbook. I always have a sketchbook on the go, and it’s filled with scruffy sketches and notes. Once I have a final sketch pencilled out, I will scan it in and come back to it later. When I am sketching, I try to keep in my mind what rubber stamp shapes I have where they could be used in the composition. For instance, I have a set of head shape rubber stamps and in the sketch stage, I will decide what stamp to use for the head.

Next is the time I get inky! I use my rubber shape stamps and print them out in black as well as using texture stamps and rollers, which can be used for things like clothing, backgrounds, or buildings. All the printed shapes and stamps are scanned in and manipulated in photoshop, overlaying the initial pencil sketch, to create the final piece. I have a set colour palette that was created from the colour pencils I have on my desk; this way I can easily replicate the colours I have in my sketchbook.

Every time I print a new shape or a texture it gets added to my digital print library, this can then draw on for all future projects and although you can purchase print textures/brushes I like how I am the only one with these particular textures and shapes, which I hope makes my work unique.

How and where did you learn to print?

I did a bit of relief and screen printing at both college and university, but my interest in printmaking really came about when I joined Swansea Print Workshop in 2011. I was there for around 2 years and then later joined The Printhaus Workshops when I moved to Cardiff in 2014.

In June of last year, I completed a master’s degree in multi-disciplinary printmaking at the University of the West of England, Bristol. I did the degree part-time for over 3 years and it was a time for me to be able to experiment and hone my craft using the fantastic equipment and guidance from the amazing staff.

Why printmaking?

I love how hands-on printmaking can be as well as how experimental you can make it. Being able to take some relatively basic tools and some ink and create something like no other in such a short space of time feels almost magical to me.

Over the years I have done a lot of screen printing, even selling quite a large range of screen printed greeting cards at one point. I feel like I have found my niche in using relief printmaking with quite basic geometric rubber stamp shapes and a bunch of rollers.

Where do you work?

I am lucky to have a studio space amongst other creatives at Meanwhile House, which is near the centre of Cardiff. The studio holders there range from a signwriter, fine artists, a chocolatier, and a florist.

Describe a typical day in your studio.

Most days I will take my boys to school and then head to the studio at 10am. More frequently now I am sat at my laptop, but I try and give myself time at least once a week where the laptop goes away and I can get my fingers inky!

I have kept a wall in my studio empty, so when I have printmaking days, I can tape up all the prints to the wall to dry and be surrounded by printed textures for a couple of days.

On days where I can’t print, I at least try and spend some time drawing. My sketchbook is full of half-baked ideas that may or may not be used at that time, but so many times I have come back to old sketches in future projects. When I don’t have to do the afternoon school run, I stay in the studio until around 6-6:30 and take a relaxed drive home through the centre of Cardiff when the roads are much quieter. This is my time to unwind, process the day and decide what needs to be done tomorrow.

How long have you been printmaking?

I did my foundation art course at college in 2003 where I was first introduced to printmaking with woodcuts and some screen printing using water-based crayons, so over 17 years now!

What inspires you?

I love mid-century packaging and illustration and I try to capture some of its nostalgic charms in my own work. I have, what I call, the inspiration suitcase. It’s an old beaten up leather suitcase that I bought years ago in an antique shop in Cardigan. It’s bursting with old postcards, tickets, packaging, sweet wrappers, matchbox labels and so much more. When I am feeling stuck, I just open up the suitcase and have a rummage through.

What is your favourite printmaking product?

The product I use every day is a Stazon Black ink pad. I have a few that are in varying stages of inkiness. I love the texture that’s transferred to the paper via the stamp and you can print the ink onto anything, and it dries in no time.

A more recent purchase though is a couple of narrow, wooden handled soft rubber inking rollers. I had been looking at them for a while and I decided to buy them as a lockdown treat! I bought the 9mm and 15mm wide rollers to create some new and interesting textures. They’re really fun to use and I can see them being used during a lot of print days in the future!

What have you made that you are most proud of?

For some reason, and I am not exactly sure why I keep coming back to the snake motif. In 2016, whilst doing a lot of screen printing at The Printhaus Workshops, I created a set of wooden screen-printed tiles that are almost like snake dominoes. I even screen-printed the box they are kept in. The wooden tiles can be laid out to create a meandering snake across the table or floor. There was only one set made and for no reason apart from just for fun, but I think that’s part of its charm. This project still makes me smile today.

Where can we see your work? Where do you sell?

I mostly post images of my work on Instagram and I have an Esty shop where I sell greeting cards, artist stamps and prints. I am working on a website at the moment with some new projects that I hope will be online in 2021.

What will we be seeing from you next?

In 2020 I had my first go at teaching some workshops via zoom and I am hoping that I will be doing more in 2021. I would love to be able to sell small rubber stamp sets that include some of my shapes so that people can have a go at printmaking at home.

2020 was a strange year and although there were many things that weren’t able to go ahead, there was a lot of joy being made by creatives across social media. I have enjoyed being part of that wave of creativity and positivity and I hope to continue creating work that hopefully brings a smile or two to people’s faces.

Do you have any advice for other printmakers and creatives?

Make time to play. By this I mean, take some time to muck about and get messy! You don’t always have to know the outcome before you start. Some of my best ideas have come when my mind has been in a state of play and curiosity. If you are having fun making something, chances are that people viewing your work will see that too. Have some fun!

To see more from Alyn follow him on Instagram.

Screen Printing a Gradient with a Split Fountain

Usually when you’re screen printing you have to use a different layer for each colour. By using a split fountain we can create a single layer screen print with multiple colours! It’s so easy. Scroll down to watch a video or read on.

Set your screen up ready to be printed. You can use a paper stencil, screen filler design or exposed screen for this technique. Tape the edges of your screen and attach it to a hinged board, if using.

Assemble your screen printing inks. Use Acrylic Screen Printing Inks for printing onto paper or Fabric Screen Printing Inks for printing onto fabric.

Think about the direction in which you want your gradient to go. The squeegee will drag stripes down the screen. You can choose to turn the screen 90 degrees and use a wider squeegee to go in the other direction if that works better for your design.

Place a sheet of paper under the screen or place the screen on your fabric.

Use a spoon or spatula to place a blob of ink at the bottom of the screen just below the design. Place the next colour right beside it (leaving no gap) and continue all the way along the width of the design with all your chosen colours.

Hold the squeegee at a 45 degree angle at the bottom of the screen. Gently push the squeegee up the screen to flood the mesh with ink. When you reach the top of the screen, holding the squeegee at the same angle, pull it down the screen, pressing harder this time. You should hear a zip sound. Leave the ink at the bottom of the screen and lift the screen up to reveal your print.

Continue to flood and print in this way, adding more ink if you need it. The separate colours will start to blend more and more as you print.

When you’ve finished printing, scrape any excess ink and keep it in a pot for another printing session. Clean the screen with a soft sponge and a bucket of cold water. Remove any tape from the screen and wipe down again. If you have printed on fabric, heat set the prints with an iron when they’re completely dry.

For this project you will need:

Using Caligo Extender and Opaque White

When mixing Caligo Relief Printing Inks (although this also applies to other brands), we can choose between adding Extender or Opaque White when we want a paler colour. They produce quite different results. Watch our video at the bottom of the page or read on.

Extender is a colourless ink. It will make colours more transparent which will allow the colours underneath to show through (this may be previous print layers or just the paper). You can mix paler shades without losing any of the luminosity of the ink.

You can use as much or as little extender as you like. More extender will create a paler, more transparent colour.

Adding opaque white will create a more pastel chalky shade. It will also make the ink more opaque: it will cover more of the colour underneath and start to show on darker coloured papers.

Removing Ternes Burton Tabs from Delicate Papers

Sometimes, when we use Ternes Burton pins and tabs, the tape sticks to the printing paper making a mess. We can choose to cut our paper a little longer so the excess can be trimmed but there’s another way that doesn’t waste paper! Watch the video below or read on.

If you haven’t heard of using Ternes Burton pins and tabs for print registration, check them out here and watch the videos on the page.

When we use Ternes Burton tabs, masking tape is usually used to secure them to the printing paper. Removing this tape can damage delicate papers.

To help remove the tape more easily, simply use a hair dryer to warm it up as you peel! The tape should come off without leaving any sticky residue behind or damaging the paper fibres.

Cyanotype

Cyanotypes (sometimes called blueprints or photograms) are made using a really old process that uses light to create designs on fabric and paper. Scroll to the bottom of the page to watch a video on the process or read on.

We are going to need a cyanotype kit. The kit contains two bottles, each with powder in the bottom. Fill each bottle with water to make two separate solutions (we mix them just before using). It’s best to add water to the bottles and shake them to mix 24 hours (or longer) before you’re wanting to start your project.

You can make cyanotypes on fabrics or paper – experiment with different surfaces. Once the cyanotypes are made they will be fixed and washable.

When you’re ready to make your cyanotypes it’s time to mix the two solutions together. Work in a space with very subdued lighting if possible. There’s no need to mix the whole amount together at once: it’s better if you only mix what you need as the life of the mixed solution is only a couple of hours. Mix the two solutions together in equal quantities.

Paint the mixed solution onto your fabrics or papers and leave them to dry in a completely dry space – a closed cupboard or box works well. The mixture will stain so be sure to lay down a protective surface first.

Whilst they are drying, gather together the items you’re going to use as masks. Leaves and plants work well. Objects with a distinctive shape or flat base are best. You may need to pin the lighter items down or place everything under a sheet of glass if it’s windy outside.

After an hour or so, the fabrics and paper should be dry. Make sure to cover them up whilst moving them outside. Placing them between two trays works well.

One at a time, lay the fabrics and papers out and place the objects on top. Pin down on place a sheet of glass to hold everything still. It’s important that nothing moves whilst they’re exposing. The timings for the cyanotypes will depend upon the light levels on the day. The cyanotype solution will start to turn from green to blue and then bronze. Cyanotypes will be paler if they’re under-exposed.

When they have finished exposing, remove the objects on top and immediately place them into a dark space again (back between the trays if using). Rinse the cyanotypes in cold water until the water runs clear. Keep them in a bowl of cold water for about five minutes.

For this project you will need:

  • Cyanotype Kit
  • A container to mix the solutions into
  • Paintbrushes
  • Fabrics and papers
  • A dark space
  • Something to carry the dried fabrics and papers in (e.g. an opaque black bag or two trays to put them between)
  • Objects to use as masks
  • Sunlight (a bright day is best)
  • Cold running water and a large bowl

Taking a Quick Proof of your Linocut with a Rubbing

When you’re carving a lino block it can be handy to be able to see how your block will print before you ink it up. By taking a rubbing of your block you can get an idea of what your final print might look like. Scroll to the bottom of the page for a video or read below.

A graphite stick works perfectly for taking rubbings. Use Newsprint as it’s thin and smooth so should give the clearest indication of your carved lino design.

Use the flat edge of the end of the graphite stick, not the point.

Place the newsprint over the block. Hold it still with one hand and gently rub the graphite stick over the lino, focussing on the raised areas of the block.

Your rubbing should show you how your block will look once printed but remember that it will be a mirror image of how your block will finally print!

For this technique you will need:

Meet the Maker: Margaux Magny

Hi, I’m Margaux. I live near St Malo in France. I’m a graphic designer by trade focusing on digital media. I have always loved drawing and art in general. My mother did a lot of painting and sculpture when I was a child and my father did a lot of DIY. I have a lot of photographers and cooks in my family, so in one way or another, there has always been an artistic influence. When I discovered printmaking it was a revelation, I became addicted to the practice. I like the long, multi-step process to get to the final print.

Describe your printmaking process.

I always start by drawing on my tablet. As much as I love working with materials and carving into linoleum, I feel very limited with pencil and paper. I prefer working on my iPad Pro with the Procreate tool. This allows me to do contrast tests and to check the areas I have to carve and the ones that I mustn’t touch. I then transfer my design to the linoleum using carbon paper. Once this is done, I carve my block and proceed to print using my press.

The work does not stop there, after a more or less long drying time, I number and sign all of my prints using embossing pliers. I also do all the packaging and sending of orders.

How and where did you learn to print?

I did an afternoon internship which allowed me to dig my first gouge into the material. From there, it’s a lot of self-teaching, reading, videos and exchanging with other printmakers on social networks.

Why printmaking?

I like the work of the material which is very pleasant. I also like the fact that I have multiple copies of my matrix to make a limited series.

Where do you work?

I work from home and am lucky to have a family house large enough to accommodate my workshop. My partner and I share a significant space for both our communication activities and our 2 craft activities; linocut for me, bracelet creation for him.

Describe a typical day in your studio.

Similarly to a lot of people, it starts by dropping the children off at school and nursery for my youngest. There is no typical day as I still divide my time between printmaking and my historical communication activity. After discussing current projects with my partner, I can devote my whole day to a session of prints, do some digital drawing, a little carving, manage my website and send my orders.

How long have you been printmaking?

I started in 2019, but I didn’t fully practice from the start. It has really been since November 2020 that I have been making regular prints.

What inspires you?

I’m mostly inspired by where I live and where I’ve grown up. All my prints have a link with the sea or Celtic legends.

What is your favourite printmaking product?

I think it is my press. In the beginning, I used to spend more time pulling my hair out over my prints than doing them. Buying the press immediately allowed me to make better quality prints and I feel like I can really push myself through with it.

What have you made that you are most proud of?

I have always struggled to be proud of my work but thanks to my Instagram activity, a small community regularly sends me messages of encouragement, showing me their fascination for my work. It really warms my heart every time!

Where can we see your work? Where do you sell?

I have a website where I sell all of my linocuts. They can also be found in some shops based in Brittany where I live.

What will we be seeing from you next?

For the next few months, I will try to produce new linocuts in order to offer a wider range of prints. Otherwise, I have 2 long-term projects: the creation of a textile line using fabric inks and I will perhaps try to launch a few introductory workshops on the practice of linocut.

Do you have any advice for other printmakers and creatives?

Practice, always practice more, be creative, be inspired and never lose hope. Always giving it your all in what you do really helps you accomplish great things!

To see more from Margaux follow her on Instagram.