Transferring an Image onto Lino

This week we wanted to test a technique for transferring an image onto lino using a printed image and an iron. It worked surprisingly well and was very quick and easy. Here’s how we did it:

Your image needs to be printed either through a laser printer or a photocopier (inkjet printers will not work). If you are working from a drawing, scan
it into the computer and print it out. It needs to be full black.

Place your printed image face down onto the lino. Your paper needs to be larger than the lino block.

Place baking parchment over the top. This will protect the lino and paper from becoming too hot and make it easier to slide the iron without moving the
image.

Iron over the top of the paper for a few minutes. Hold the paper and lino still with one hand. We used the iron on its hottest setting for about three
minutes. You can carefully peel up the paper in one corner to check its progress.

Remove the paper to reveal the transferred image! We were pleased with the strength of the lines and the fact that they didn’t smudge. The transfer is
a little patchy but you can see where all the cuts need to be made.

If you make any mistakes or the image smudges under the iron, the carbon can be removed with nail varnish remover and a cotton bud.

We tested this technique on a few of our other printmaking materials but the traditional lino was definitely the most successful:

Softcut lino – the image turned yellow before it turned black. The black can be removed with nail varnish remover but the yellow stain stays behind. The
softcut also warped a little in the heat! In retrospect perhaps it would have been better to turn the iron down a little…

Mastercut – the image turned yellow and then the Mastercut started to warp before the image could be properly transferred.

Japanese ply – the image transferred beautifully but then the layers of ply began to separate (!) The think this would work better on a solid piece of
wood.

You can watch a video of the transfer here:

or click here to see the video full size.

Registering a Print with Ternes Burton Pins

We’re really excited to have Ternes Burton pins and tabs in stock! We have already started using them for our own work and wanted to show you a really simple example of how they can be used to register block
prints with effortless accuracy. We’ve whipped up a quick reduction print and a multi-block to show you how they work!

Printing a Reduction Linocut using Ternes Burton Pins and Tabs:

You’ll need a pair of pins and a flat board that is bigger than your paper.

Tape the pins to the top of the board using parcel tape. The holes in the pins will allow more of the tape to stick to the board and stop the pins from moving. Place the
lino underneath the pins (leaving enough space for your paper all the way round). Stick the lino down with double sided tape. It will need to stay
here for the whole printing process.

Place your paper over the lino. Leave a little extra space at the top that can be trimmed off later if you can.

Snap your stripping tabs onto the pins so that they overlap the paper. They should make a clicking sound as they go into place. Stick your tabs down with masking tape. If your
paper has a correct print side, make sure the paper is print side down.

Prepare your paper for the whole edition in this way. You’ll need two tabs for each piece of paper in your edition. We sell them in packs of approximately
100. 

Ink up your first layer. We inked up our block using Caligo Safewash Relief Inks and a Hawthorn Roller onto an uncut piece of lino.

Click your paper back into place using the strips and pins.

Take your print using a baren or by putting the board through a press. The pins are slightly lower than the height of a piece of traditional lino
so will go through a press easily with no damage!

Remove the paper by peeling it off the block and unsnapping the tabs from the pins. Print the first layer of your whole edition this way.

We wanted to use a simple grid to show you the accuracy of the registration.

Carve your block whilst it remains stuck to the board.

Ink it up with your second colour.

Snap the tabs of each piece of paper to the pins and print as before. The paper will go down in exactly the same place as on the first layer.

The edges line up perfectly!

Printing a Multi Block using Ternes Burton Pins and Tabs:


We are using Softcut for this print. It is important to make sure your blocks are exactly the same size and shape.

Stick your pins as before. Use mount board corners or plastic (as we have used here) to register your block. Both of your blocks should be able to
slot into the space without room for movement.

Ink up the first block. Place it into the space.

Snap your tabs on the paper to the pins.

Place the paper down and use a baren to take your print.

Ink up the second block and place it on the board in your marked out space.

Snap the paper to the tabs and take your second layer.

You can find Ternes Burton Pins sold in pairs here and Strippng Tabs in packs of 100 here!


Meet the Maker: Amy Laws

It’s time to meet Amy! We love Amy’s beautiful designs, hands-on making process and enviable attitude. Read all about her here:

Hello I’m Amy Laws! I setup There’s Only One Amy Laws, a handmade and hand printed
clothing business, just over 3 years ago. I design, screenprint and sew every garment from scratch in my flat in Bath. My aim is to make unique clothing
with fun, playful prints that my customers will love to wear time and time again.

How and where did you learn to print?

I learned to screen print at the Edinburgh Printmakers. I’ve always filled sketchbooks with ink drawings in my spare time and thought that screenprinting
would give me the opportunity to turn my sketches into prints. I took a weekend course and then used their open workshop facilities in the evenings
and at weekends while I was working.

Why screen printmaking?

I love the effect of the print and how you can take a complex image either straight from a drawing or a computer graphic and create an exact replica on
the screen. It’s also possible to create your own screen printing setup at home fairly cheaply which has been essential for me to start my business.

Is there a story behind the ‘There’s only one’ bit of your brand?

It just started as a joke! I remember making a sticker for my friend at school that said There’s Only One Amy Laws, then later on my sister had clothing
labels made for me with it on and it just stuck. I didn’t really give it much thought when I set up my business but now it gets a bit embarrassing
when I have to give my company name to people over the phone!


Where do you work?

I work from the living room in my flat in Bath and then 2 days a week I rent a room at The Makery, a lovely sewing studio and shop in town. It’s really
helped my sanity working out of the house for a couple of days a week!

Describe a typical day in your studio.

I’ve got into quite a good weekly routine, on Mondays I cut and print all of my orders for the week and take over the whole flat with fabric drying on
every surface. I then spend the rest of the week sewing up all of my orders depending on what needs to be posted out first. I start everyday replying
to emails and ordering equipment, have a break at lunchtime for Neighbours and finish most days with a walk down the hill to the Post Office.

How long have you been screen printing?

I took a screen printing course in Edinburgh about 10 years ago but then I moved to London and didn’t do any printing for about 5 years. It was only when
I was struggling to find exciting fabric to sew with that I thought about printing my own. I did a lot of internet research and found out how to create
screens at home and it all developed from there.


What inspires you?

I love bold colours and simple, graphic styles. I like looking at vintage fabrics and dresses for inspiration, particularly the 1950s/60s style. A lot
of my prints are inspired by nature but then I really simplify the designs and use vivid colours so they look more cartoon like by the end. I’ve also
just created a The Potteries print inspired by the wonderful Stoke-On-Trent where I grew up.

What is your favourite printmaking product?

I think it has to be the Permaset Aqua inks, I’ve tried lots of other brands but I’ve found I get on best with these inks. As they’re water-based they’re
really easy to clean and safe to use at home as they are completely solvent free, they don’t dry out as quickly as other water-based inks either and
they wear really well.

What have you made that you are most proud of?

I think I’m most proud of my Wild At Heart print. I love the 4 colour design and how the print works around the border of the skirt. It took quite a bit
of planning to figure out each screen layout, and how to repeat the print around the hemline.

Where can we see your work? Where do you sell?

I have my own website www.theresonlyoneamylaws.co.uk, and I also have shops on Etsy and Folksy. I also trade at the Frome Independent Market once a month.

What will we be seeing from There’s only one Amy Laws next?

I’m just making a new range of espadrilles, I’ve screen printed the fabric for them using the designs from my dresses and then sewn the shoes together
by hand. I’m also working on a couple of new prints for Summer at the moment, I’ve got a palm tree print which is starting to take shape quite nicely.

Do you have any advice for other printmakers, designers and creatives?

Don’t give up! If the first things you make don’t turn out how you expected keep on going. When I first started I had grand plans for my prints but I struggled
for so long trying to get the screens to develop properly and print how I wanted them to, there were a lot of tears! I kept researching online and
trying new techniques until I found a method that worked for me.

You can see more of Amy’s work on her website! Find out what Amy’s up to on Facebook, Twitter and Instagram.

How to Block Print with Lino onto Fabric

We get a lot of questions about the best way to lino print onto fabric. Which ink should I use? Should I use a roller? Will it be washable? Will it change
the handle of the fabric? These are all questions to which we wanted to know the answers – not just for all of our lovely customers, but for our own
work too!

We have tested four different inks on

cotton , each using the same

lino block , to give you the methods available for creating beautiful block printed fabric!

All of the prints below were made on a slightly padded surface. This is a really important tip when printing onto fabric as it makes it easier to get an
even print. We use an old blanket stretched over a board then covered with cotton. Too hard a surface and you will get an uneven print, too soft and
you will get a messy print so experiment with what you have at home.

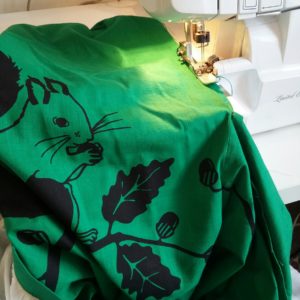
We used the block made in our
last blog project !

1:

Versacraft Fabric Inks Pads

We sing the praises of these humble little ink pads a lot and Handprinted. We love how quick, easy and tidy it can be to print onto fabric, paper and so
many other surfaces.

We tested

Versacraft Poppy Red.

Inking up a block is so easy and mess-free. I like to have the block face up and use the pad press all over. This way you can see how much ink you are
putting on and where it’s going.

Press the block onto your fabric, making sure to press all over.

Versacraft prints fairly evenly and easily. The ink pad used for this print has been used a lot in our studio and still has a lot of ink left. A brand
new ink pad would produce a slightly stronger colour.

Iron to fix the prints when dry and the fabric will be washable and not fade. The handle of the fabric doesn’t change at all.

The prints are fairly even but not always completely consistent. I prefer to use

Versacraft ink pads with a softer printing material such as Mastercut which is perfect for stamping.

2.

Caligo Safewash Relief Pri
nting Inks and a

roller

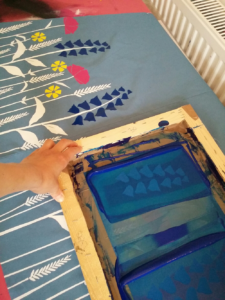
We are testing Caligo Process Magenta Relief Ink using a

Soft Rubber Roller . The ink is oil based but water soluble (you can wash up with water and soap or a baby wipe) – the best of both worlds!

This ink rolls out beautifully into a lovely tacky square on a glass slab.

The ink rolls out easily onto the block. We use this ink for relief printing all the time and love the way it works with lino. You can mix in some extender
if you would like a more transparent ink that goes a little further.

Caligo inks are designed to print onto paper – they are not made for printing onto fabric. However, we have used them to print on fabric before and will
again! They print beautifully, evenly and with good colour. The downside to using these inks is that they take a day or two to properly dry. Once dry
they are washable and hold their colour very well! The ink leaves the fabric soft with only a small change to its handle. (Please test this ink on
your fabric for drying time and wash-fastness before you undertake a large project as this ink was not originally designed for use on fabric and results
may differ.)

3.

S
peedball Block Printing Inks for Fabric and a roller

We’re using the Red from the multi-pack kit but they can also be bought individually in larger sizes. We are using it with the same soft rubber roller
as before.

The inks rolls out well. It’s a little less tacky than the Caligo because it is water based.

It rolls out onto the block well.

The colour is strong and the prints are neat but a little less even than the Caligo and the Versacraft. Because this ink is designed for block printing
onto fabric it becomes washable without losing colour after being left for approximately one week to air dry. The handle of the fabric barely changes at all.

4.

Speedball Fabric Screen Printing Ink and a

sponge roller

This is a technique that we are always suggesting to our customers. The screen printing ink is more economical, completely washable, colour fast and easy
to use. We are using Speedball’s Red ink but

Permaset Aqua inks work just
as well. A sponge roller is necessary for these inks as they are much looser and more slippy. An ordinary roller would just slide around in the ink
and not put down an even layer.

The ink rolls out easily with a sponge roller if you don’t press as hard as you normally would with a hard roller. You’ll need to spoon out more ink than
you would with a block printing ink as the sponge absorbs some.

A firm pressure transfers the ink well onto the block.

These prints can be a little bubbly textured where the sponge has been used –  seemingly the only down side to this method.

The prints are bright, washable after ironing and change the handle of the fabric not one bit.

All the prints together:

(Although the inks were all red, the shades differ as seen above).

The

S
peedball Screen Printing Ink prints the boldest and brightest, is the most washable, does not change the handle of the fabric and is the most economical
(a 236ml pot of the ink will cost under £10 and last a very long time). you will need to use a sponge roller with this ink as a hard roller will
slip.

The

Caligo Relief ink  produces
the most even print with a consistent colour, rolls out in the most satisfying way possible and washes well. It does however take a long time to dry
and leaves a very very slight stiffness to the fabric. (Please test this ink on your fabric for drying time and wash-fastness before you undertake
a large project as this ink was not originally designed for use on fabric and results may differ.)

The

Versacraft Ink Pad s are by far the easiest to use, require the least equipment and a spend of only £5.50. The prints are a little less bold when
using lino rather than a stamping material such as Mastercut and the method may become a little tedious if printing a large area of fabric (I’m currently
about a third of the way through printing a duvet cover using this method which looks lovely but is taking a very long time! I expect I will have to
keep my duvet in the living room so that more people might see it).

The Speedball Block Printing Inks for Fabric serve their purpose very well, producing a strong colour and soft handle with good wash-ability. They do work out a little more pricey than the Screen
Printing Inks though, at the same price for a smaller quantity.

We hope our testing helps you to discover the right method for your project!

Meet the Maker: Laura Boswell

We are really excited to have Laura Boswell visit us to teach a Japanese Printmaking Workshop in September (this course is now full. Give us a call or
email if you would like to put your name down on the waiting list. We will see if we can persuade Laura back for another workshop!) Learn about Laura
and her work in this week’s Meet the Maker:

Trained in Japan, Laura Boswell is a printmaker specialising in rural landscape, working in classical Japanese water based woodblock and reduction linocut.
She divides her time between printmaking, teaching, writing a monthly page for Artist and Illustrators Magazine and public art. She has work in national
collections including the House of Lords and the National Library of Wales. Learn more about Laura and her work here:

Describe your processes.

I specialise in relief printing, specifically reduction linocut and Japanese watercolour woodblock and my subject matter is the rural and coastal landscape,
usually images of the UK, but sometimes from my visits to Japan

How and where did you learn printmaking?

I specialised in printmaking during the final year of my joint visual arts/art history degree at Aberystwyth University and went on to learn Japanese woodblock
during an artist residency in Japan in 2009

Why Lino and Japanese woodblock?

I gravitated towards linocut at university because I liked the bold colours and graphic quality of the medium, also because it was something I could self
teach – I was the only one in my year to work in printmaking so I spent a lot of time working alone! Japanese woodblock I discovered through learning
about the residency offered to printmakers through the Nagasawa Art Programme. It is a little known process in the UK and a great privilege to have
learned in Japan.

Where do you work?

I draw and photograph out in the landscape, but most of my work is done in my studio where I turn my sketches into ‘design drawings’ suitable for making
a print. The printing is all done in my studio at home.

Describe a typical day at work.

I usually begin the day at about 8.30 with answering emails and catching up on any paperwork which needs doing – gallery admin, teaching duties etc. Then,
if I am working in the studio, I will go and begin cutting and printing. If I am working on lino, I may be juggling three or four prints at once. With
Japanese woodblock I am usually only working on a single print at a time. Sometimes I could have a one to one day with a student in my studio in which
case I spend the day both teaching and acting as a technician to facilitate the student’s printing. If I am alone I will also answer mails if needed
through the day and also update Facebook which is an important part of my marketing: I treat it as my virtual open studio and keep followers up to
date with work and any useful hints and tips about printmaking. My working day usually finishes around 7pm.

What inspires you?

Lots of things, but usually it begins with colour and shape. I spend a lot of time looking at other artists, including lots of artists from the past, not
necessarily printmakers. I am also constantly looking at the landscape trying to work out the essence of shapes: what makes a cloud different from
a tree etc. Inspiration comes from all over – I am often interested in textiles and product design, or it could be a film, car drives, walks, museum
visits. Almost anywhere, any time.

What is your favourite printmaking product?

I would have to say the Japanese printing brushes I use. I like that their design has barely changed since the tenth century and I have my pick between
summer deer hair, winter horse hair and other natural bristle brushes.

What have you made that you are most proud of?

That’s hard to say as, once the work is created, I am already falling in love with my next project. There are a couple of prints that I did in Japan that
I am very fond of and proud to have printed successfully. Mrs Sasuka’s Garden and Bluebells, Wet Spring were both so tricky to design and print that
I am proud to have printed both.

Where can we see your work? Where do you sell?

I sell on line, in galleries, at my Open Studios and art fairs. My web site has an on-line gallery and always has details of upcoming events and a list
of galleries that show my work

What will we be seeing from Laura Boswell next?

At the moment I am very seduced by British birds. I have just done a series of linocut designs which will be turned into large enamel panels for an arts
trail on the Grand Union Canal. They feature local water birds and I am now expanding that series to other birds while keeping the same simplicity
of design

Do you have any advice for other printmakers, designers and creatives?

I would say that you have to be businesslike and pragmatic if you are a self employed artist like me. I see myself as running a small business with all
the admin, marketing and paperwork that that entails. To me that is part and parcel of being a professional artist and is best done efficiently and
regularly as part of the job alongside the creative time in the studio. The other bit of advice is to be generous with your knowledge and advice: what
goes around, comes around and I think openness and sharing is the best way to build a good reputation, which in turn leads to a successful career as
a self employed artist.

See more of Laura’s work on her website