Batik Course with Noel Dyrenforth

I don’t know about you, but thanks to years of being in school followed by forever being surrounded by children and teachers, Autumn will always signal the beginning of my year and a time to learn something new. This year’s September-knowledge-thirst led me to a weekend-long batik course run by Noel Dyrenforth in Hove.

The course was organised by Angela Lenman and was full of passionate batik artists, all with more skill and experience than I…

Over the weekend we worked on three batiks, using a variety of traditional and more experimental techniques. Below are some pictures I snapped along the way to give you a feel of what we got up to.

First we drew our designs onto cotton and stretched it onto frames. I used a
castellated frame as it meant I didn’t have to make one the right size (it also was a little easier carting it on the train from Chichester)!

We used Procion MX Dyes mixed with soda ash to fix the dye. Here is the fabric after the first layer of turquoise dye:

We used a blend of beeswax and paraffin wax which gives you the right amount of crackle whilst staying smooth. Here is my first batik after the next layers of waxing and dyeing:

As it turns out, making a batik has a lot to do with being patient. If you put the hot wax onto dye that is not completely dry it will not penetrate the fabric and wont resist the next layer of dye properly. Thank goodness for cold hairdryers and cups of tea.

The last layer of dye after a final hefty waxing.

We all used Tixor Malam Batik Pots (Guild members were bringing them in by the box-full) which seemed just the right size for a honey coloured pool of wax that lasted the entire weekend.

The second batik we worked on gave us the opportunity to play with a lovely range of Procion MX Dye colours.

Throughout the weekend we used a variety of tools to apply the wax; from Javanese Tjantings to kitchen roll and decorators brushes (natural bristles only unless you want to end up with a melted plastic blob on the end of a stick). One batik artist even broke out a Kistka in order to achieve even more detail whilst we all ooh-ed and aah-ed.

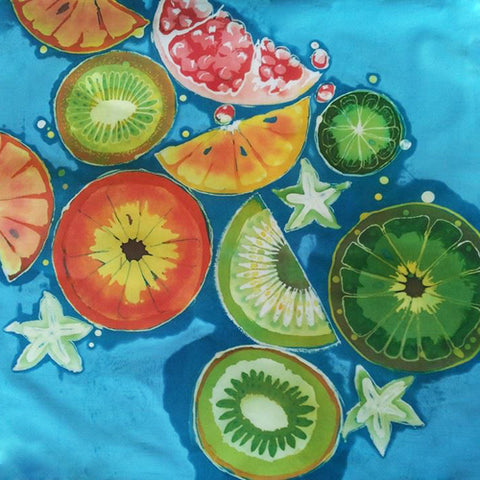
I was particularly proud of this juicy looking pomegranate, drawn with a Size 1 Tjanting:

We ironed the batiks between sheets of newspaper to remove most of the wax, but they will need to be dry cleaned or boiled to remove the rest. The dark blue marks around the fruit below are where the ironed wax has melted and spread and will disappear after the fabric has been cleaned.

Etching into the wax was another technique that was new to me – using a tool to scratch into the wax creates details that the final layer to dye can pick up.

Below is a batik created by a fellow batik enthusiast – far from the fiddly white-outlined paintings often associated with batik!

My final splashy, dynamic batik, created by splattering and brushing on wax between four layers of dye.

The weekend’s most important lesson from Noel: If you’re wondering whether to create movement, dynamism and expression with wax or dye, it should always come from the wax.

Lesson learned.

If you fancy having a go yourself, information about the Batik Guild can be found here and lots of lovely batik supplies can be found on our website.

How to Make a Rainbow Tie Dye T-Shirt

We thought it was about time to write a blog showing you how to make this funky rainbow spiral tie dye T-shirt. They come out slightly different every
time so once you’ve made one, you’ll want to make one hundred. It’s that addictive. Here’s how:

You will need:

Start by prepping your T-Shirt. Lay the shirt out flat on a table. Use a clothes peg to pinch the middle. Make sure that the peg holds both the front and
the back of the shirt. Using the peg as a handle, start to twist the shirt. Try to get fairly even peaks and troughs: if you get any mountains of fabric,
just tuck them in. 

When your shirt is twisted into a vaguely round shape, use elastic bands to hold it together.

Use three bands over one another to create six segments.

Soak your shirt in a solution of warm water and soda ash. Use 1tbsp of soda ash for every litre of water. For just one shirt, we used two litres. Soak
the shirt for at least fifteen minutes.

Whilst the shirt is soaking, prepare your dyes. Add 1tsp Procion MX dye to 200ml warm water. We recommend that you wear rubber gloves as the dyes will
stain!

Use a funnel to decant the dye into one of the squirty bottles and shake to mix.

Repeat this for the other two colours of dye.

Your six segments are going to form a colour wheel. Each of your three primary colour dyes will be squirted into three of the segments. Every other segment
will have two dyes squirted into it, creating a secondary colour!

After your shirt has finished soaking, squeeze out any excess water and lay it onto a piece of cling film.

Take a bottle of dye and squirt your first colour into three of the segments (half of the shirt). Turn over and do the same on the other side.Wipe any
excess dye off the cling film. You don’t want your shirt sitting in it or the colours will mix.

Next, take the second colour. Squirt into three segments, starting with the last segment of the previous colour. Wipe down the cling film again.

Finally, take the third bottle and squirt into the final three segments. Make sure you have put all three colours on both the front and back of your shirt.

You should end up with a wheel of shirt that looks a bit like this! The dyes will start to mix and you will begin to see the orange, green and purple segments
appearing.

Wipe off any excess dye again, and wrap the shirt up in the cling film. Leave for 24 hours for the dye to set. Don’t be tempted to move it around too much
or the dyes could mix!

After 24 hours (well done for waiting, we know it was tempting), unwrap you shirt and, leaving it tied up, rinse in cold water until it runs clear. Remove
the elastic bands and wash with Metapex or non-bio detergent (if using a machine, please run on the hottest wash with detergent and an empty drum before
doing your next load or prepare to have multicoloured socks).

Here is our finished T-Shirt!

Screen Printing onto Furniture: How to Print a Table Top

One of the best things about screen printing is that it allows you to print onto almost any flat surface! This week, we have been using Speedball Acrylic Screen Printing Inks to print on this gorgeous 1960s coffee table. Here’s how to do it:

You will need:

Print out the design for your table top onto OHP film (make sure that the OHP you buy is compatible with your type of printer). For our two-layer screen
print, we printed out two separate layers of OHP. You want the design to be solid black so that no light can be seen through. Here is what our design
looks like when the two layers are laid on top of one another: 

Next, prepare your screen. Wash the screen to make sure there is no dirt or oil on the mesh. When it is dry, it is ready to coat. Fill the Sensitiser bottle
half full with water and shake until all the crystals have dissolved. Add this solution to the Photo Emulsion and mix well until it is one solid colour
throughout. Pour some of the mixture into your coating trough. Tilt the coating trough against the mesh at the bottom of the screen. 

When the Photo Emulsion has reached the mesh all the way along, drag the trough up the screen to coat the mesh. Use the trough to scrape off any excess
and use a rag to wipe off any thick lines around the edges. You can decant any excess emulsion from the trough back into the bottle for another
time.

Put your screen in a dark place, such as a cupboard, to dry horizontally. The air needs to circulate around the screen so prop up the edges with blocks.
This will take a few hours or overnight.

When your screen is dry, you are ready to expose your image. We have used our beloved new exposure unit in our studio, but you can find instructions
on how to do this at home here. We expose our screens for five minutes in our exposure unit or for fifteen minutes with a 250W lamp. 

When your screen is exposed your image should look paler than the space around it. Wet both sides of the screen, then use a powerful jet of water to
wash the unexposed emulsion out of the mesh.

When it is all washed out, you should be able to see light through it, like this: 

When the screen is dry, tape up the edges on the front and back, so that there is no open mesh anywhere other than your design.

To prepare our table for printing, we scrubbed it all over with wire wool, to give the surface a key, and to remove any flaky varnish. We then cleaned
and dried the surface.

For a repeating pattern like ours, start printing at one end. Raise the other end of the screen up to the same height as the table top with blocks
or sponges. Our table top can be unscrewed from the legs (hooray for clever 1960s designs), so we could place our table top on our print table.
If you cannot separate yours from the base, get a helpful person to hold the screen in the right position while you print.

Put a line of ink across the top of your design and use the squeegee at a 45 degree angle to pull the ink through the mesh. We used Speedball Acrylic
Screen Printing Ink in Peacock Blue.

Quickly dry the print a little with a hairdryer. You want it to be dry enough so that it will not be smudged when placing the screen back on top. Don’t
leave the screen for too long though, as the ink will dry in the mesh and be impossible to wash out!

When the ink is touch dry, place the screen back on top for the next print. You can see through the mesh to check you are putting it in the right place.

Repeat the same process until your first layer is complete!

Leave this layer to dry. Meanwhile, wash your screen thoroughly to remove all the ink. When both the screen and the first layer of print are dry, you
are ready to print the second layer. We are using black.

Repeat the same process as with the first layer, looking through the mesh to align the design and drying each print slightly before moving onto the
next.

To block off any areas that you don’t want to be printed, use some newsprint. We wanted one section of our print to be red, so we used newsprint to
block off the the rest of the design.

When your print is thoroughly dry, coat it in a layer of clear spray varnish. This will help the surface to be a little more hard wearing.

Here is our finished table!

Screen Printing onto Furniture: How to Print a Table Top

One of the best things about screen printing is that it allows you to print onto almost any flat surface! This week, we have been using Speedball Acrylic Screen Printing Inks to print on this gorgeous 1960s coffee table. Here’s how to do it:
Print out the design for your table top onto screen film. For our two-layer screen print, we printed out two separate layers of screen film: one for each colour. You want the design to be solid black so that no light can be seen through. Alternatively, you could draw directly onto screen film with opaque zig marker pens; this way you don’t have to do any digital processes at all!
Here is what our design looks like when the two layers are laid on top of one another:
Next, prepare your screen. Wash the screen to make sure there is no dirt or oil on the mesh. When it is dry, it is ready to coat using a Photo Emulsion Kit. Fill the Sensitiser bottle half full with water and shake until all the crystals have dissolved. Add this solution to the Photo Emulsion and mix well until it is one solid colour throughout. Pour some of the mixture into your coating trough. Tilt the coating trough against the mesh at the bottom of the screen.
When the Photo Emulsion has reached the mesh all the way along, drag the trough up the screen to coat the mesh. Use the trough to scrape off any excess and use a rag to wipe off any thick lines around the edges. You can decant any excess emulsion from the trough back into the bottle for another time.
Put your screen in a dark place, such as a cupboard, to dry horizontally. The air needs to circulate around the screen so prop up the edges with blocks. This will take a few hours or overnight.
When your screen is dry, you are ready to expose your image. We have used our beloved new exposure unit in our studio, but you can find instructions on how to do this at home here. We expose our screens for 5 1/2 minutes in our exposure unit, or you can use a Speedball UV lamp at home.
When your screen is exposed your image should look paler than the space around it. Wet both sides of the screen, then use a powerful jet of water to wash the unexposed emulsion out of the mesh. When it is all washed out, you should be able to see light through it, like this:
When the screen is dry, tape up the edges on the front and back, so that there is no open mesh anywhere other than your design.
To prepare our table for printing, we scrubbed it all over with wire wool to give the surface a key, and to remove any flaky varnish. We then cleaned and dried the surface. For a repeating pattern like ours, start printing at one end. Raise the other end of the screen up to the same height as the table top with blocks or sponges. Our table top can be unscrewed from the legs (hooray for clever 1960s designs) so we could place our table top on our print table. If you cannot separate yours from the base, get a helpful person to hold the screen in the right position while you print.
Put a line of ink across the top of your design and use the squeegee at a 45 degree angle to pull the ink through the mesh. We used Speedball Acrylic Screen Printing Ink in Peacock Blue.
Quickly dry the print a little with a hairdryer. You want it to be dry enough so that it will not be smudged when placing the screen back on top. Don’t leave the screen for too long though, as the ink will dry in the mesh and be impossible to wash out!
When the ink is touch dry, place the screen back on top for the next print. You can see through the mesh to check you are putting it in the right place.
Repeat the same process until your first layer is complete!
Leave this layer to dry. Meanwhile, wash your screen thoroughly to remove all the ink. When both the screen and the first layer of print are dry, you are ready to print the second layer. We are using black.
Repeat the same process as with the first layer, looking through the mesh to align the design and drying each print slightly before moving onto the next.
To block off any areas that you don’t want to be printed, use some newsprint. We wanted one section of our print to be red, so we used newsprint to block off the the rest of the design.
When your print is thoroughly dry, coat it in a layer of clear spray varnish. This will help the surface to be a little more hard wearing.
Here is our finished table!
You will need: