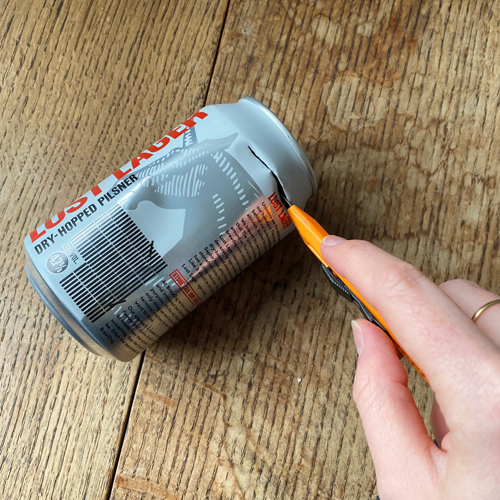
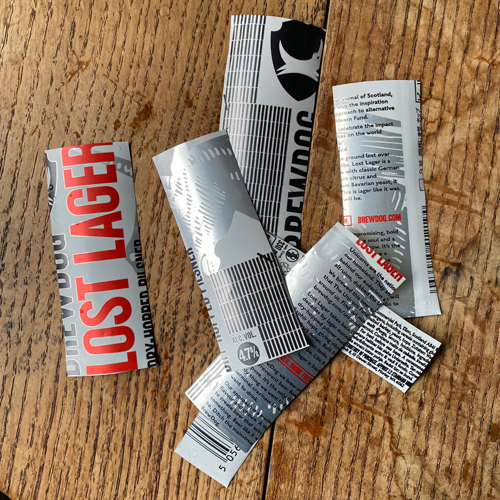
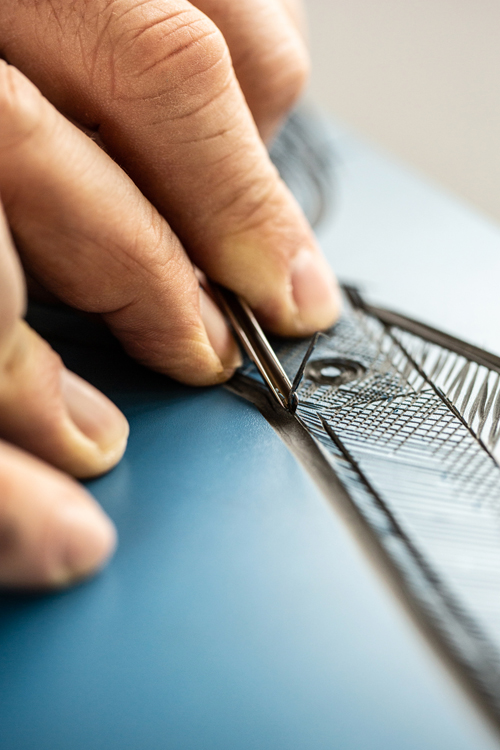
When printing with intaglio methods (etching, drypoint, collagraph etc.), it’s important to print onto dampened paper. Imagine you’ve just inked up your plate, your paper is soaking in a tray of water or in a stack and it’s time to print. You wash your hands but there’s still a little inky grubbiness in your fingerprints and that damp paper is going to be ruined with a smudgy fingerprint! We use paper fingers to keep our paper pristine and protected from grubby marks. Using folded scraps of paper is a great solution but they will only last for one or two uses. Using a can is a great way to make a collection of long-lasting, washable paper fingers that won’t cost you a penny. We first learned of this idea from Steve Edwards who will be teaching Multi-Block Etched Lino at our studio in November.
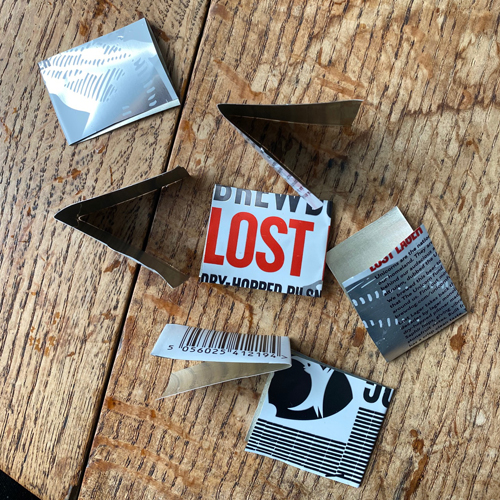
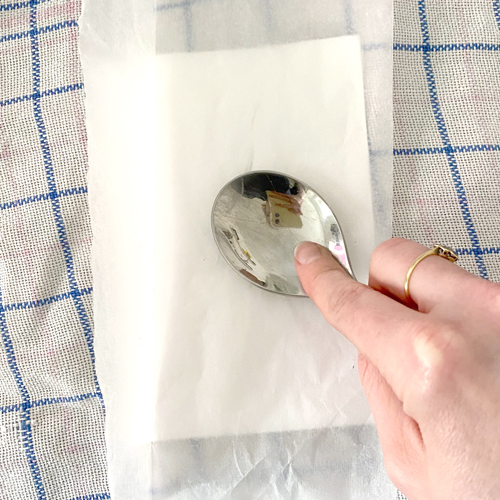
Carefully use a craft knife to cut a slit into the top of the can.
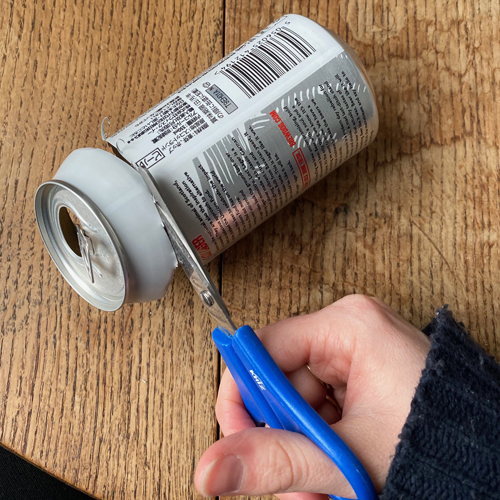
Finish cutting all the way around the can with a pair of scissors.
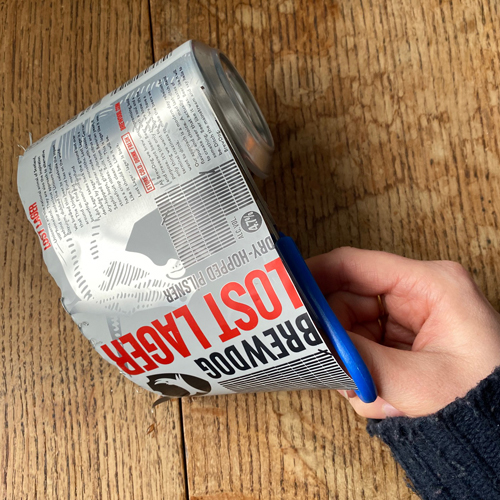
Cut down the length of the can and around the base.
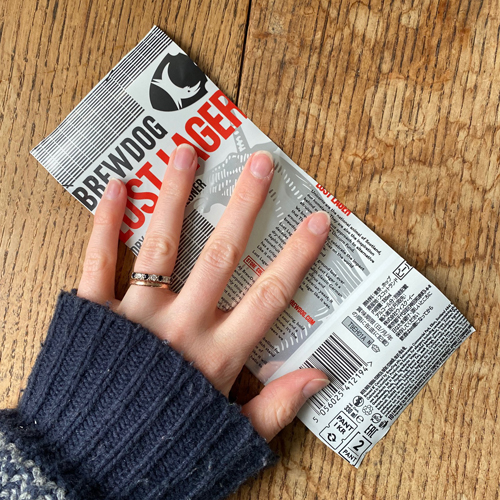
You should be left with a rectangle of metal. Neaten up the edges with scissors to remove any sharp pieces of sticking up metal.
Cut this rectangle into strips 2 – 3cm wide. Cut parallel to the short edge.
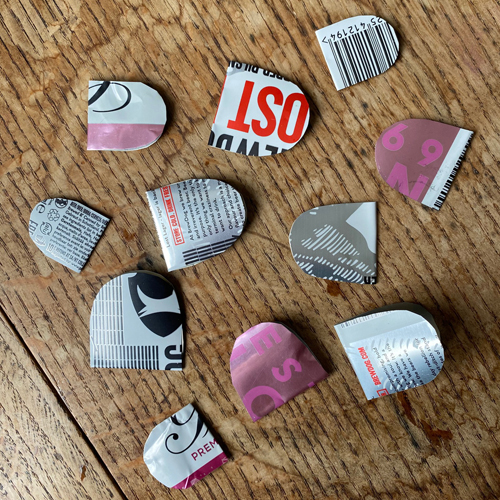
Fold each strip in half.
With the strips folded, round the two unfolded corners into a D shape.
These can be made from any drinks can so start holding onto great coloured and patterned cans to build up your collection of paper fingers!
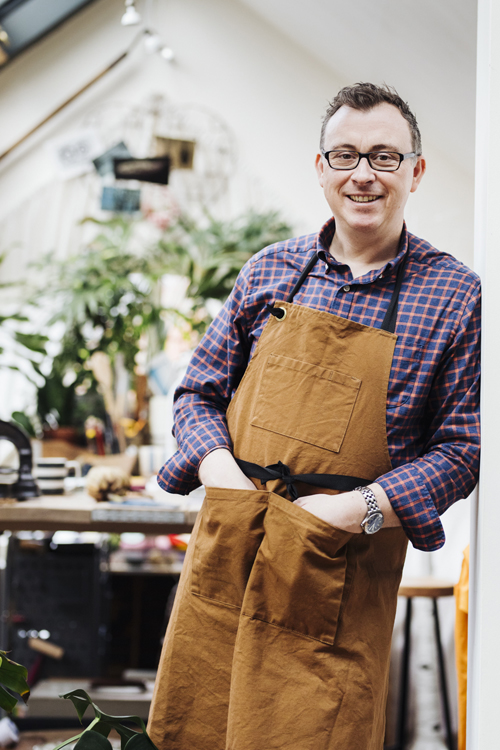
My Name is Mark Lord and I
have set up a lino print business called Lino Lord. I make limited edition hand
printed quality prints to display in peoples homes or work places.
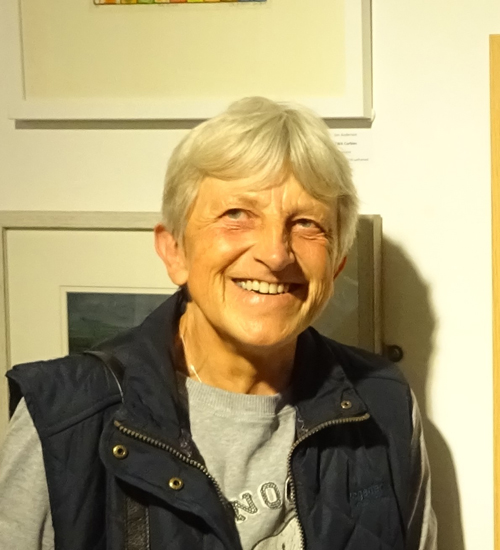
Photo by Eva Nemeth
I’m a professional photographer with 20 years experience and generally if I’m photographing people, animals and plants in our countryside then I’m very happy. I have a passion for the handmade and traditional crafts and skills and have photographed many creatives in my time. I have been longing for a handmade craft to do at home and decided to have a go at lino printing last year. I am totally absorbed when I’m in the process of making prints and love it as a release from my photography.
Photo by Eva Nemeth
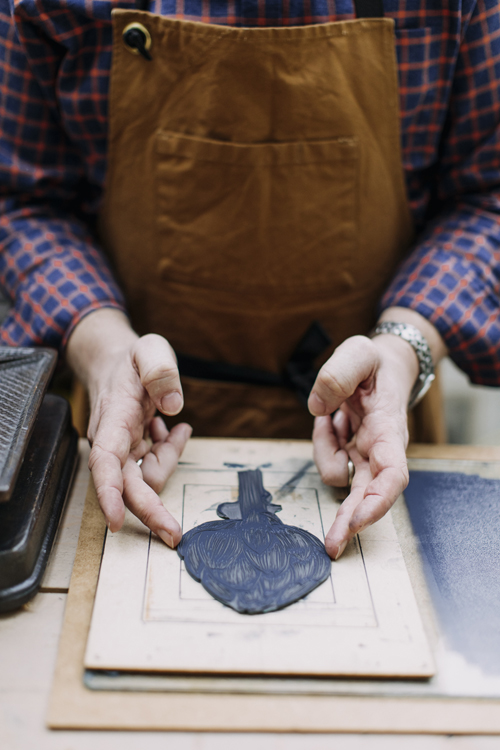
Describe your printmaking process.
I
start with an initial idea, the lightbulb moment, & then
work up my ideas using my skill as a photographer for composition.
Having initially studied film photography I am used to composing
in-camera, I try to bring these ideas across to my lino work.
Photo by Eva Nemeth
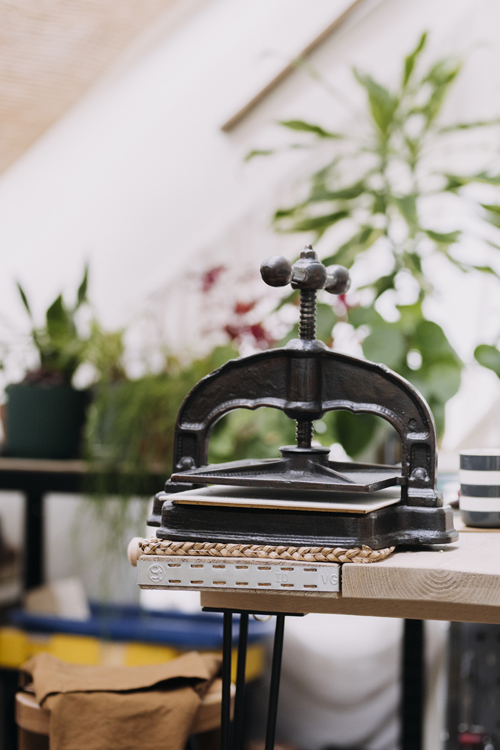
I generally use Japanese Vinyl from Handprinted and use Pfeil tools which are great to carve into it. I always use Cranfield inks and either use a baren or I’m very lucky to have an old French book press my wife bought me. I love using it and often wonder the stories it can tell and where its been in its last 100+ years.
How and where did you
learn to print?
At the beginning of 2019 my wife & I turned a little used spare room in our house in a studio. It’s in the eaves of our house but one side is completely glazed – ideal for a studio/workshop but not great for a bedroom. We got the space completed but I was initially unsure what to do. I then thought back to my art foundation days & the idea of lino printing came into my head. This was the last thing I did at art school on my Foundation course before I picked up a 35mm camera!
I have done two courses, one with Claire Florey Hitchcox in Oxford and one with Lou Tonkin in Cornwall which were both great and taught me the basics I needed to learn.
Photo by Eva Nemeth
Why printmaking?
As a full time
photographer so much of my life, as with many others, revolves around computers
and technology. I was looking for a pastime that was strictly
analogue – aside from photographing my work & instagram & Etsy of
course. The
great thing about printmaking is the tactile nature of carving the block &
then producing a small run of limited editions of the work without the need to
purchase any expensive kit or involving any technology apart
from my vintage French press. With the limitations of a home studio I was looking for
a medium that didn’t create too much mess & are no hazard to the
humans or felines living in the house. It’s important to me to use traditional
skills & use the best ink, print on the highest quality handmade paper and
ultimately produce work that I’m really proud of.
Where do you work?
As mentioned before I work in a home studio upstairs in the eaves. It’s a shared space & my wife and I will spend many a happy hour pottering away. Since the lockdown, when we are at home every day with little photography work, I have semi relocated to the table in the lounge. It’s placed opposite a large arch topped window (our home is in a converted stable block) opposite the village green. At a time when life can feel very isolated I am enjoying watching people stroll by on their daily exercise.
Photo by Eva Nemeth
Describe a typical day in your studio.
Due to my full time job of photography taking up a lot of my time lino printing was squeezed in after a day at work or at the weekend. Typically I like to work on new designs and carving most of the time I have then print one day a week. This cuts down the cleaning up part of the process and the cat getting inky paws!
How long have you been
printmaking?
Apart from dabbling at it
during my art foundation course I have only been printmaking since Spring
2019.
What inspires you?
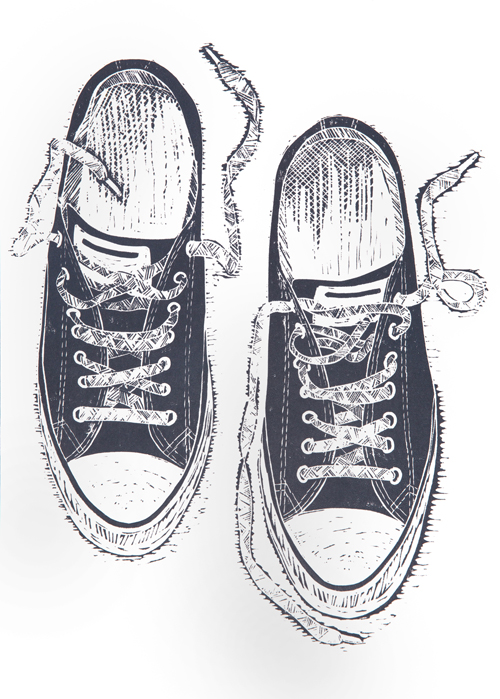
I am inspired by strong,
graphic shapes & love making art from the vintage kitchenalia & plants
around our home. At the moment I am working on a linocut based on my favourite
very beaten up Converse. I love to look at the work of other printmakers
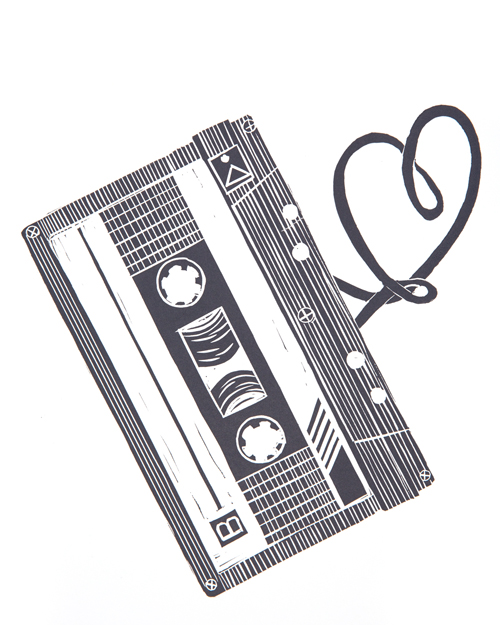
on Instagram and really enjoy the Instagram community.
What is your favourite
printmaking product?
It has to be Cranfield Inks, they have a great range of colours that also mix together really well. The print quality I get from their inks is second to none & for someone working from a home studio being to wash up in the kitchen sink is great.
What have you made that
you are most proud of?
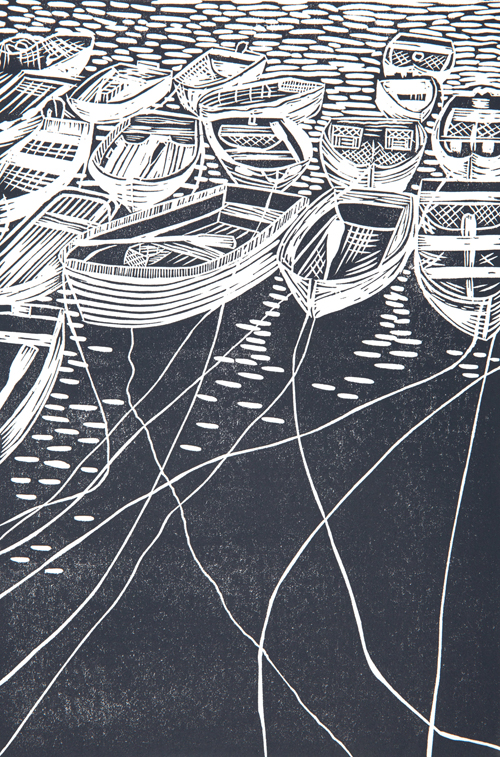
I think my favourite piece of work is my piece called “All Tied Up’ – a print of rowing boats from the quay in Mevagissey in Cornwall. I carved this block last summer on a lovely afternoon in the garden.
Where can we see your
work? Where do you sell?
I primarily sell through Instagram @linolordpress and also have a shopfront on Etsy. I will be taking part in Oxfordshire Artweeks, I should’ve been spending a week in May in the wonderful Orange Bakery showcasing my work but due to the Coronavirus the exhibition is going online from the 2nd May.
What will we be seeing
from you next?
Well, the next print
will definitely be my faithful converse but after that who knows?!
During the lockdown I’m busy working away so hopefully more work on my
Etsy shop in the coming months.
Do you have any advice for
other printmakers and creatives?
My advice is to keep it simple and make work that interests you. Those not on Instagram I would recommend signing up as its a fabulous community and you generally get lots of good feedback and you will pick up lots of tips and tricks along the way.
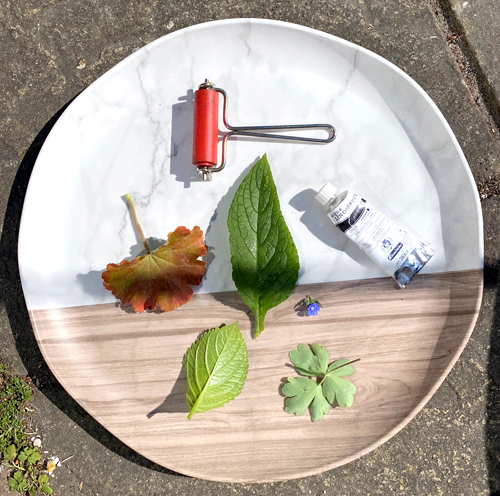
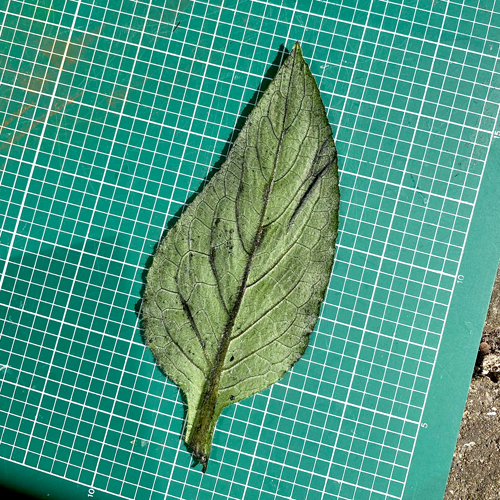
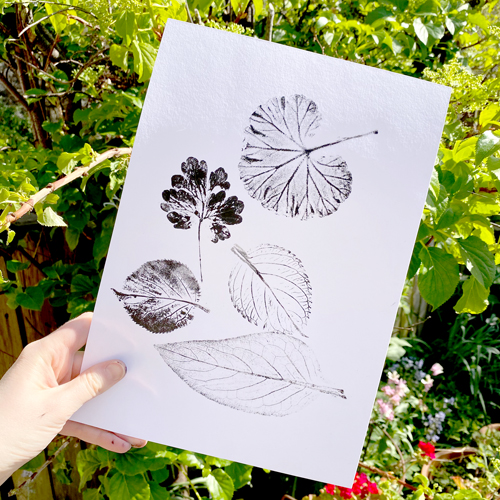
Printmaking doesn’t have to be tethered to a studio or kitchen table. This project takes you outside to gather and enjoy the natural materials around you! Go for a walk around the garden, your road or even just your house and collect a few leaves with different shapes and textures.
Use a tray or inking plate to roll out a small amount of ink. Water-based ink will create quick-drying prints but be aware that it will also dry quickly when rolled out on your tray if you’re printing in the sunshine so only roll a small amount out and top up if necessary. We are using Schmincke water-based ink here but an oil-based ink like Caligo Safe Wash will work brilliantly too.
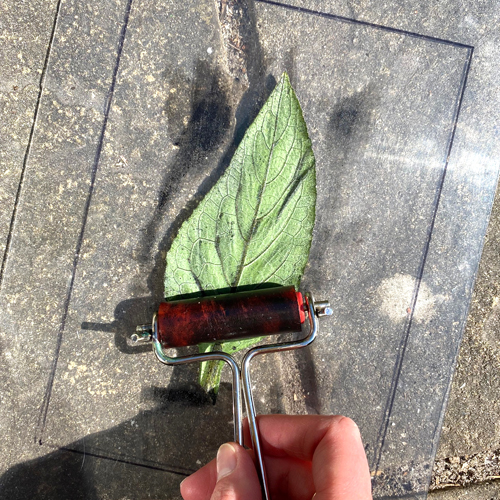
With a lightly inked roller (these wire–handled rollers are perfect for this), roll over the top of a leaf. Ink up the veined side to make the post of the texture. Use a magazine page, inking plate or sheet of acetate underneath catch the edges of the ink.
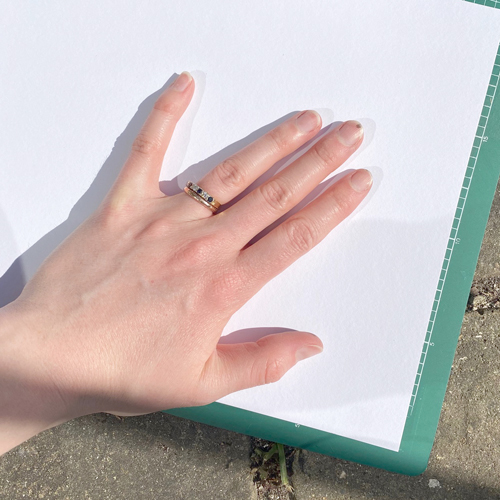
Place the leaf inked side up onto a smooth, clean surface – a cutting board is perfect.
Place a sheet of paper on top of the leaf. We are using Snowdon but anything will work – experiment with what you have. Rub all over the back of the paper with the flat of your hand. Use your fingertips to work around the stem of the leaf if you can feel it through the paper.
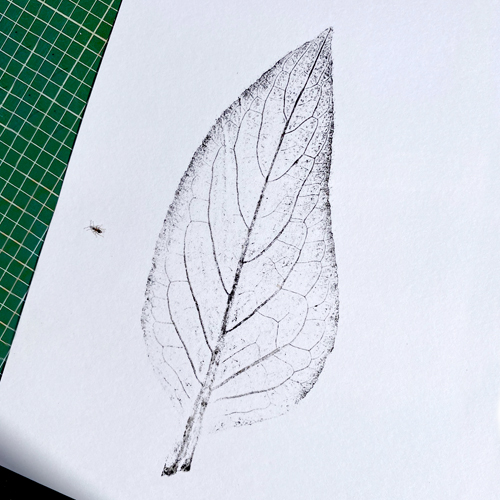
Lift up the paper and peel the leaf away to reveal the print!
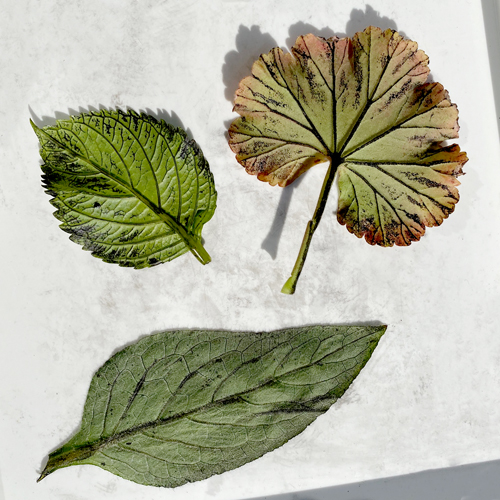
Use a variety of leaf shapes for maximum design points. Some leaves will pick up more ink than others.
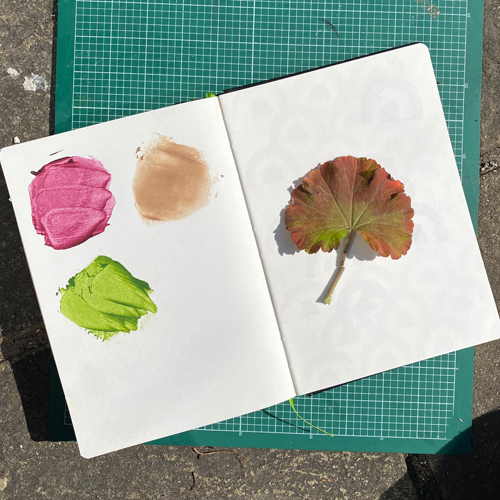
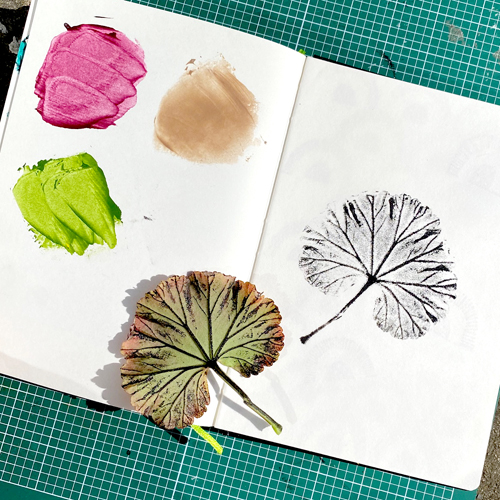
You can also make these prints easily in a sketchbook. Just ink up the leaf as before, place it face down on a page…
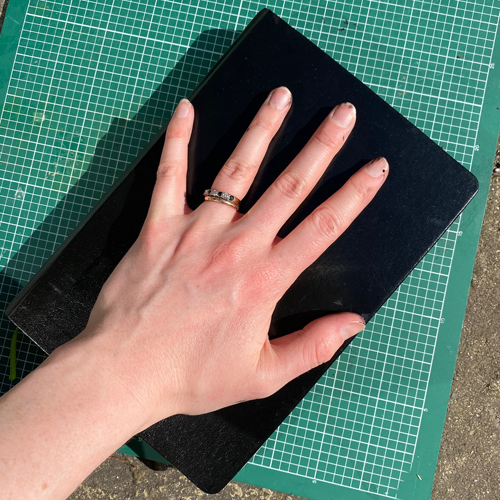
…shut the book and press (or step) firmly on the cover.
My name is Margaret Mallows. Having loved
drawing and painting from an early age, I was encouraged by artist Dennis
Syrett to continue after leaving school at 16, and had work exhibited in The
Mall Galleries in London for 2 consecutive years when still a teenager. A very
busy work and family life put art on hold for more than four decades, and I
started again about 4 years ago, teaching myself lino printing.
Describe your printmaking process.
Prints start from drawings or photographs. I
decide how many prints I want in the edition, and first get the paper and
registration board ready, lining up the blank lino onto the registration board
by taping strips of card around the lino which will hold it in place when
printing. Once I am happy with the image, I trace it and transfer to lino – I
use the Japanese vinyl. Most of my prints are the reduction method with just
one sheet of lino used for the whole print. The first layer carved will always
be those areas of the print to remain white (or paper colour). Once the first
colour is printed, more lino is carved away to leave behind the colour just
printed, and the next colour applied. The process is repeated until the print
is finished. By the end of the print, there may be very little lino left! I use
Schmincke water based inks, they stay wet on the palette but dry quickly once
printed, so I can always add the next colour without long waits for drying
times. With most prints, I work from lightest colours first through to the
darkest.
How and where did you learn to print?
I am self-taught; I bought a starter lino kit
and book and from the very start I was hooked, I wanted to do more and learn
more. It’s been a steep learning curve of trial and error, with many mistakes
made and learnt from!
Why printmaking?
I have always liked hand-made prints, they
have a unique quality all of their own and it’s an affordable way to own
original art. I wanted to try it for myself, and since starting I’ve never
looked back – I love the whole process.
Where do you work?
My prints are made in my home as I don’t have
a studio. A study is used for drawing, carving lino and hanging prints to dry,
and my kitchen/dining room is ideal for inking and printing – worktops are used
for inking and the dining table is used to hold a removable a table top press.
Describe a typical day in your studio.
When I’m making a print it rather takes over
my life – I will often start very early and work until I’m too tired to do
more! Cups of tea sustain me throughout the day, and I like to end the day with
prints hanging to dry in my study, ready to start carving the next layer of
lino early the next day. Reduction prints require good concentration, so I try
to remain fully engaged with a print until it is finished – and then take time
to catch up with other things before starting new work.
How long have you been printmaking?
About 3 ½ years, and I now work full time at
my printmaking.
What inspires you?
My garden and life around me and objects in my
home. And sometimes other people’s photographs, used with their permission.
What is your favourite printmaking product?
That’s easy – Ternes Burton pins and tabs make registering prints simple, and with reduction printing the same print may go through the press many times – I’ve used up to 17 colours or more in one print, so any mis-registration could otherwise ruin the edition at any stage.
What have you made that you are most proud of?
My Sun, sea and shadows print. It’s not the
largest or most complex I’ve made, but was still challenging. It’s a 13 colour
reduction print, and getting the cutting and colours right was very tricky.
Currently it is shortlisted for the Royal Academy summer exhibition, so fingers
crossed the show goes ahead albeit late, and that the RA likes it! It can be
seen on my Instagram page along with some work in progress of the making of it.
Where can we see your work? Where do you sell?
My work can be seen in my Artfinder shop. Artfinder provides a global market place for my work and is run by a small, dedicated team of people. It is the first online art site I applied to, and having enjoyed consistently steady sales there ever since I’ve never felt the need to sell at another site – my work is now in 19 countries worldwide. I sell at local fairs as it’s nice to meet and engage with people, and also exhibit at curated exhibitions in London and locally when I am lucky enough to have work accepted.
Work in progress photos I usually post on my Instagram page @margaret.mallows
What will we be seeing from you next?
With a head full of ideas for new work, I
never have any trouble wondering what to do next – just difficulty choosing
which idea! And having just finished a print, I’m still undecided which idea to
pick next.
Do you have any advice for other printmakers and creatives?
Don’t be discouraged by failures or things not
working as you’d hoped. Everything I’ve learnt has been a result of making
mistakes! If you are struggling with any of the materials you have, try
different ones – buy small amounts to try first to see if you like it. And ask
advice from other printmakers, most happily share tips and advice.
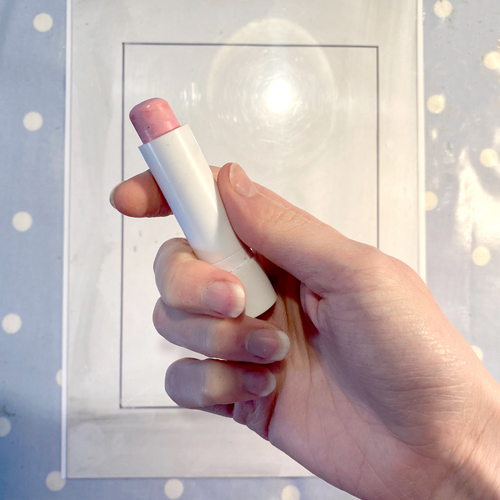
Viscosity printing is a process that uses different viscosities (stickiness) of ink to enable you to ink up a plate with more than one colour – the different viscosities of ink will not mix. The foundations of this method can be used to create monotypes where a greasy medium can be used to resist ink.
For this method, we are using a lip balm! This is an old petroleum-based lip balm. Its greasiness will resist an oil-based ink. Vaseline can also be used and applied using a brush or your fingers.
Draw with the greasy medium onto an Inking Plate, sheet of acetate or toughened glass. Remember that the final print will be a mirror image of what you draw! This lip balm is slightly tinted which makes it easier to see where the lines have been made. It is likely that tints will show up slightly in the print so lipsticks are not advised!
The drawn marks will repeal the ink. When printed onto white paper, these marks will remain white.
Roll out a thin layer of oil-based ink. We are using Caligo Safewash Relief Ink. Results from other inks may vary – have fun and experiment! Try to roll the roller down the plate only once – too many times will cover up the marks. The roller will also pick up some of the grease and set it down in unwanted areas if the roller is overused.
Lay a sheet of thin paper over the top of the print. Use the heel of your hand or a barn to rub all over the back of the print, covering every area firmly. Peel off the paper to reveal the print!
Remove the excess ink from the plate with a drop of oil and a rag. Wipe the plate clean with soap and water and dry before using it for the next print.
Experiment with mark-making, drawing images and text (backwards of course). Apply the balm to your fingers and fingerprint onto the plate before inking up. The Curious Printmaker has even tried this using faces!
I begin with a few sketches and then I draw directly on
to the block to work out the final details, I like the work to evolve and I
enjoy the serendipity of this process. I use pins and tabs to ensure a safe
registration so that the prints are consistent quality. I don’t decide how many
layers there will be, this evolves with the print.
How and where did you learn to print?
I first dabbled with printmaking at Art school, my first
degree was in fashion design in the days pre internet, which is hard to
imagine these days and work was hard to come by. So I retrained as a nurse
and have proudly worked for the NHS for the last 15 years, however a series of
challenging and sad life events made reevaluate my life, I was working
very long hours in a highly stressful role as a Matron. Although I feel
honoured to work as a nurse, I felt that something was missing and I
wanted to discover what that was. So I quit my job and demoted myself to enable
me more time to explore, I enrolled at University of Cumbria on to the MA
Creative Practice and found my way in to the print room and I never looked
back.
Why printmaking?
I love
drawing and painting but there is something in the process of printmaking that
captivates me. It involves planning and implementing but also learning to think
critically as things do not always go to plan, I love problem solving.
Where do you work?
Full-time as a nurse and weekends and evenings as a
printmaker
Describe a typical day in your studio.
I do most of my printmaking on the weekends as I
still work full time in the NHS, so I relish making an early start and go to
the studio which I am lucky enough to have in my garden. It is a converted
garage and is basic but my haven, almost everything in there had been
re-purposed I have a huge old farmhouse table with a really
big piece of glass salvaged from my greenhouse that fell during a
winter storm, it’s excellent for rolling ink out on and cleans really
well. I have an old double drying rack which I was lucky enough to buy from the
university, but I did invest in a printing press which massively increased
productivity. My cocker spaniel always comes with me and sits on her bed
watching me work, I listen to radio 4 and drink gallons of herbal tea as the
day progresses.
How long have you been printmaking?
I have only been seriously printmaking for
around 3 years or so, I am still very much a learner, but this is also one of
the attractions of printmaking.
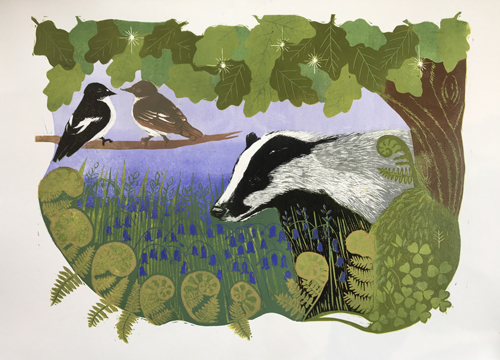
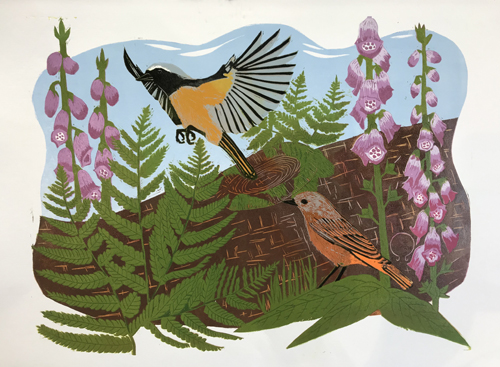
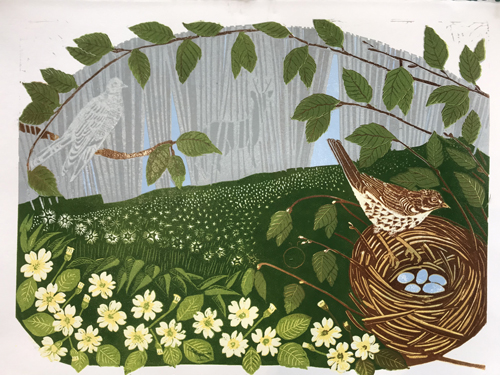
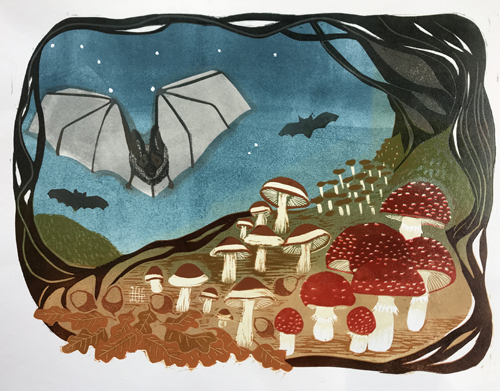
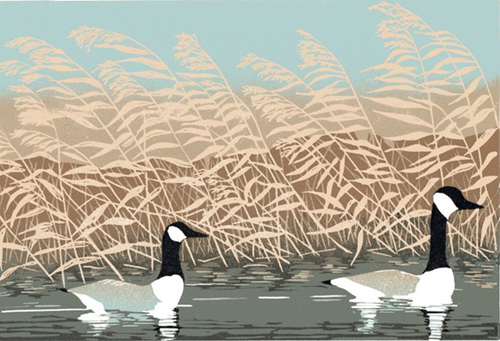
What inspires you?
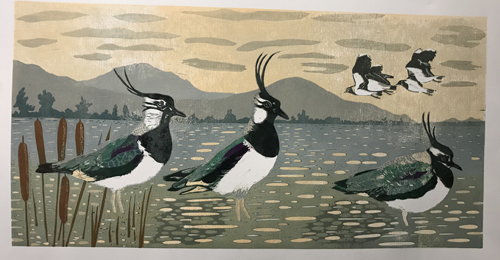
It sounds corny but nature is the most inspiring thing ever, I love wildlife, hedgerows, woods, big Cumbrian skies, but I especially love birds. I will sit for hours in the garden and will always take my binoculars with me when walking in the Lake District which is on my doorstep. Other printmakers who inspire me are Robert Gilmor, Robert Greenhalf, Babs Pease and many others. I love the subject, execution and colour palettes.
What is your favourite printmaking product?
Pfeil tools are amazing and really brought joy to my carving, they are comfortable to hold and precise in their cutting, so long as you look after them that is.
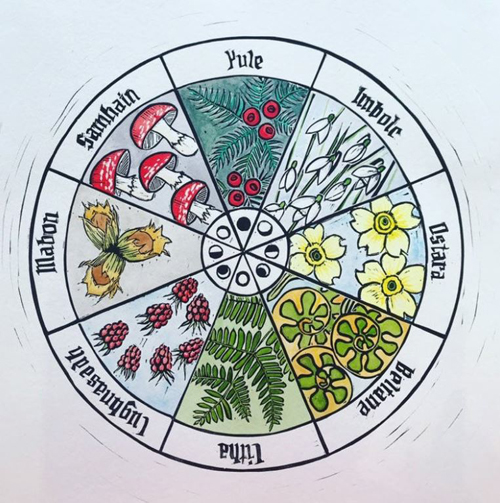
What have you made that you are most proud of?
I am always
most proud of the thing that I have just finished, but I am enormously proud of
the work I produced for my final exhibition. It is a series of 8 linocut
reductions which represent the 8 seasons as portrayed through the pagan wheel
of the year. The work was my inquiry in to
humanity’s disconnection from nature, I wondered when we became so
disconnected. Our ancestors knew what time of year it was based upon what they
saw growing, wildlife behaviours, they knew to forage for food and medicine. I
placed this disconnection at the time that the Gregorian calendar was
created and this is why I used the ‘Wheel of the Year’ as a protest to this
modern interference.
Where can we see your work? Where do you sell?
I was lucky enough to exhibit at Printfest 2019 and
I am a member of Cumbria Printmakers. You can currently find my work at The
Robinson Gaye Gallery Hexham, The Cookhouse Crafts and Cookhouse Gallery in
Windermere, Arteria with 23 Lancaster, The Bumble Bee Gallery Kirby Stephen and
the Makers Mill Keswick. I also supply limited edition prints and greetings
card at the National Trust shop in Grasmere.
What will we be seeing from you next?
I have just purchased equipment that will enable me to
produce etchings from my studio, so hopefully you will see these. I’m also
going to expand on my final exhibition work and continue to explore the pagan
theme.
Do you have any advice for other printmakers and creatives?
I would say don’t take yourself too seriously, enjoy the process and continue to learn. Instagram has a great and supportive community of printmakers and I have learned a lot from asking questions from printmakers that I follow.
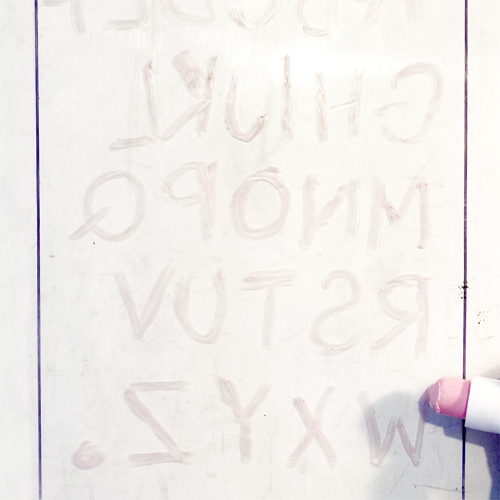
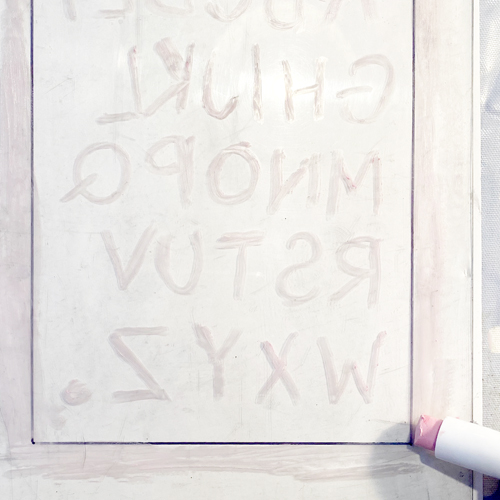
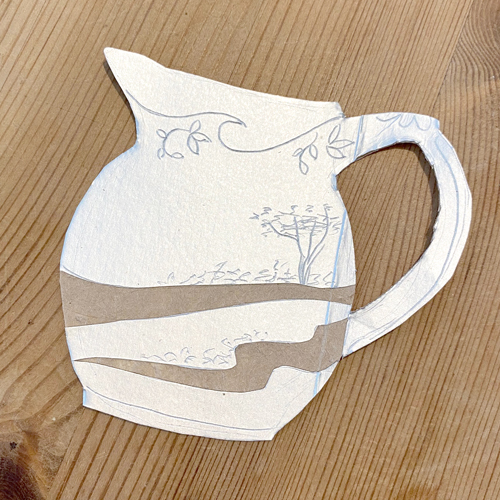
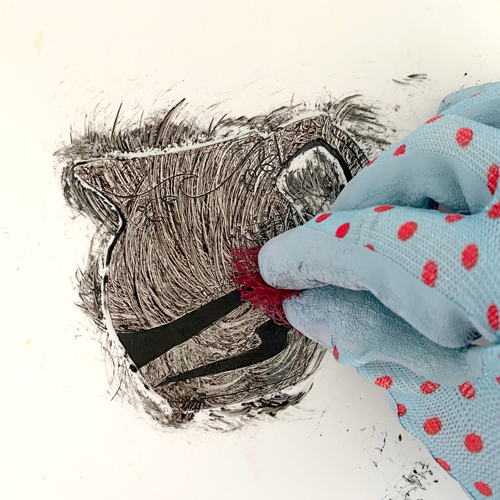
Intaglio printmaking is a printmaking method using marks incised into a plate. Ink is worked into the recesses of the plate and is usually printed onto dampened paper through an etching press. Intaglio printmaking can create strong positive marks, interesting texture and tone – these results shouldn’t be missed out on if you don’t have access to a press! Read on for an at-home method for printing a tetra pak collagraph plate without a press.
You’ll need to save a tetra pak from your recycling bin – UHT and plant milk cartons, juice cartons and passata packets are all examples of what can be used. Give them a good rinse and cut them to unfold into a flat plate.
The fold lines in the plate will usually affect the print so either avoid them or embrace them as part of the design for a quirk of the medium.
Use an etching needle to scratch into the plate. Any other tool sharp enough to score a mark without cutting the cardboard will do the trick – try a nail.
These scratched lines will hold ink and print as a positive mark. We can also create areas of dark tone by peeling away the wipe-clean plasticized surface to reveal the fluffy cardboard layer. Score the edges of a shape…
… and carefully peel the top layer from the card.
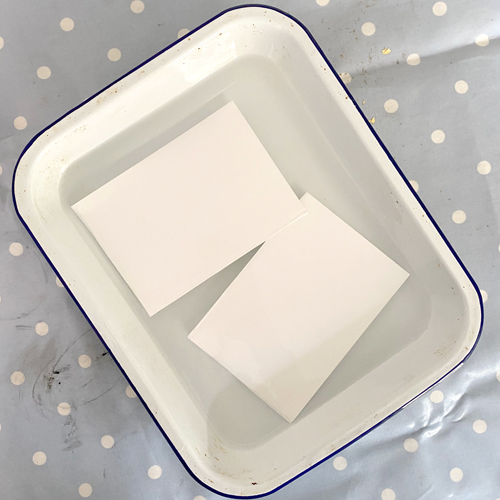
The intaglio printmaking method usually requires dampened paper. The damp paper helps to draw the ink from the plate. Damp paper is also softer and so can flex into the texture of the plate to reach the ink and create debossed plate marks. A thicker paper will handle being soaked without warping or falling apart. We’re using Snowdon which is a 300gsm cartridge printmaking paper.
Before beginning inking, soak the paper in a tray of cold water. The time it takes to ink a plate is usually around the right time to soak the paper but you can experiment with different lengths of time.
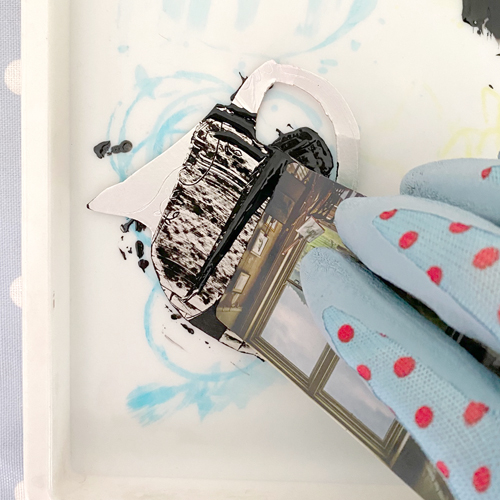
Apply ink to the plate using a piece of mountboard or old store card. Scrape it onto the plate and into the lines. Intaglio ink is best for this process – this is Akua Intaglio Ink in Carbon Black.
Next, we need to work the ink into the lines and texture of the plate whilst removing excess ink from the surface. Scrim or tarlatan is best for this. If you don’t have that, any gauze or netting can work – here we are using the mesh bag from a pack of onions!
Polish the excess ink from the surface using tissue paper. This piece came from some packaging. Absorbent tissue will not work as well as it can remove too much ink. We want most of the ink to be cleaned from the smooth surface of the plate. Any remaining ink will give the image some tone. Take care not to clean too much or the ink could be removed from the lines.
Remove the paper from the water bath and blot off the excess. We want the paper to be damp but not dripping wet. Blotting paper is best for this but a clean tea towel works well.
Finally, we are ready to take the print. An etching press would squeeze the paper against the plate. When taking a print without a press we need to try to keep the paper and plate from slipping. We don’t have this problem with relief printing as there is more ink on the surface to stick the two together. Placing the plate down onto a clean tea towel (although not your favourite one as the back f the plate is likely to be dirty), helps to reduce the slippage.
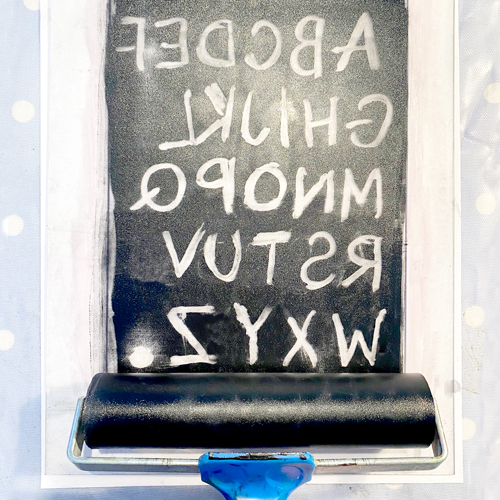
Place the damp paper on top of the plate. Cover with a scrap of baking parchment. This will stop the damp paper from pilling or slipping. Use a spoon to press all over the print. Press firmly but be very careful not to move the pieces around. Use your other hand to hold them still.
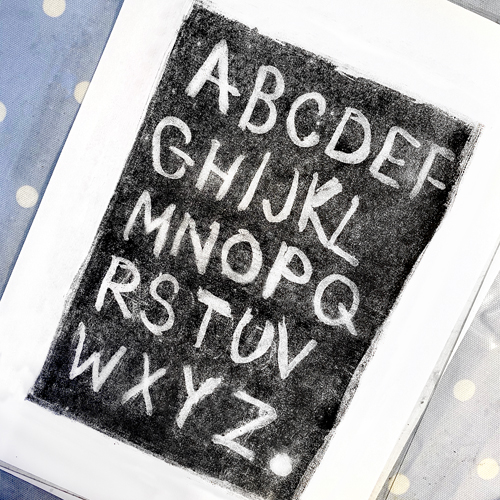
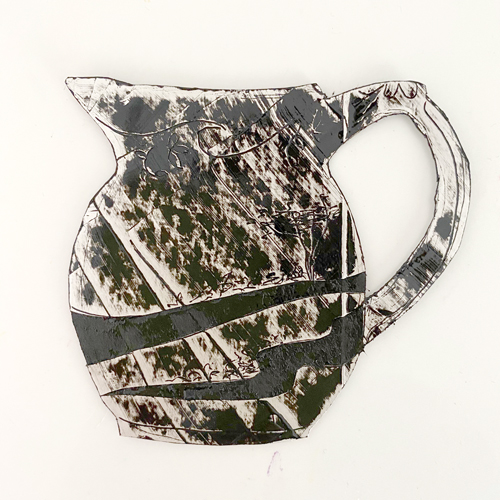
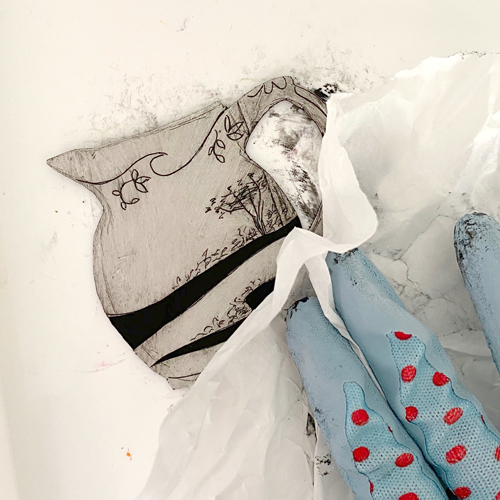
Peel apart the paper and plate to reveal the print!
I’m a linocut artist based in a small village on the Norfolk/Suffolk borders. Art was the only subject I enjoyed at school and actually felt I was good at. However, it took nearly 40 years plus voluntary redundancy and children leaving home for me to find the time to rekindle that love.
Describe your printmaking process.
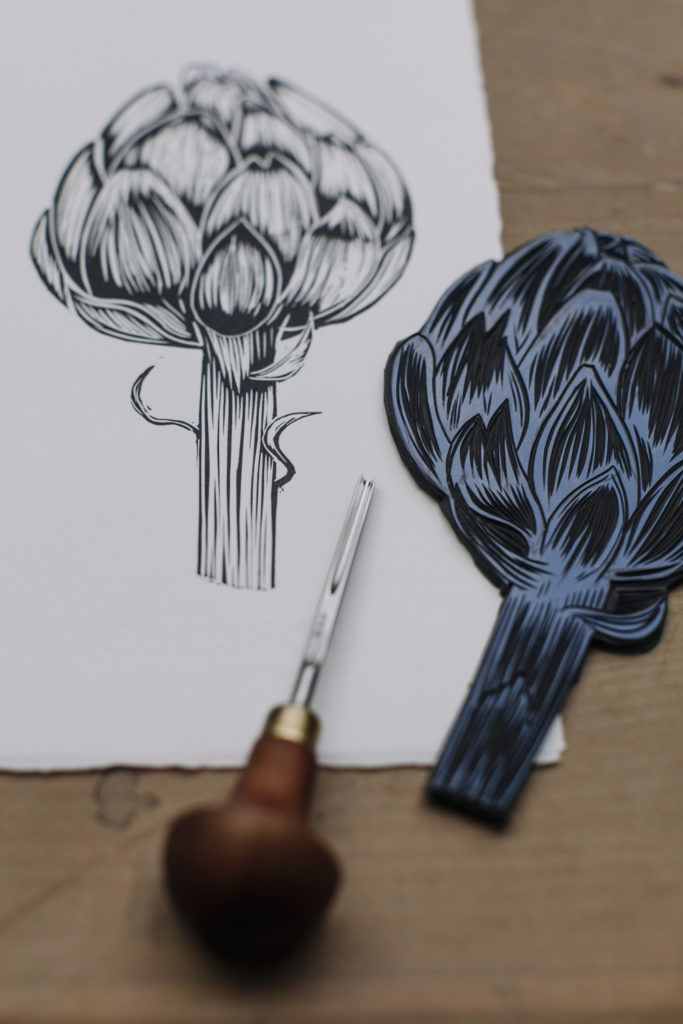
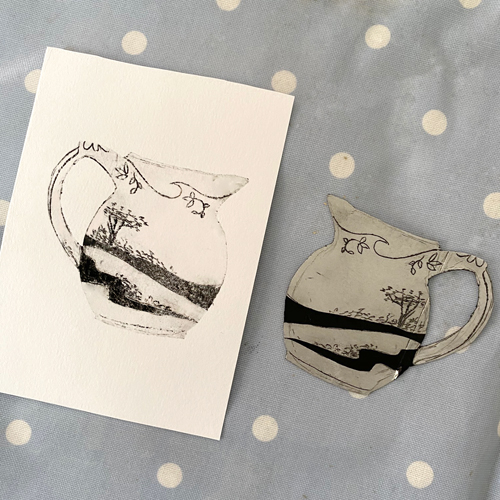
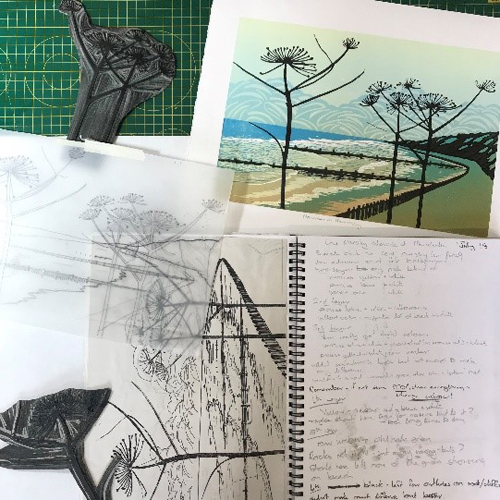
I work with grey lino, mainly using the reduction technique, to produce multi-coloured prints from a single piece of lino. My print runs are very small, usually with a maximum edition of around 12. I love the many processes involved in creating a linocut, starting with an initial sketch and photographs, transferring the image to the lino and gradually carving and then inking up and printing the image in its various layers. Sometimes, only a very small printable area remains for the final, darkest tone. As the block is essentially destroyed during the process, a reduction print can never be reprinted.
How and where did you learn to print?
After a lot of trial and error on my own, I stumbled upon the workshops at Handprinted. In 2016 I attended a two-day reduction workshop with Ian Philips and what a difference it made. Suddenly all the things I’d been trying to do came together. Since then I have attended three more of Ian’s workshops at Handprinted, the last one being multi-block printing which opened my eyes to even more possibilities. I also did a two-day workshop (again at Handprinted) with Nick Morley, another two days elsewhere with Laura Boswell and one day with Alexandra Buckle. Every time I’ve attended a workshop, I’ve learnt something new, but I guess Ian’s style suits mine the most.
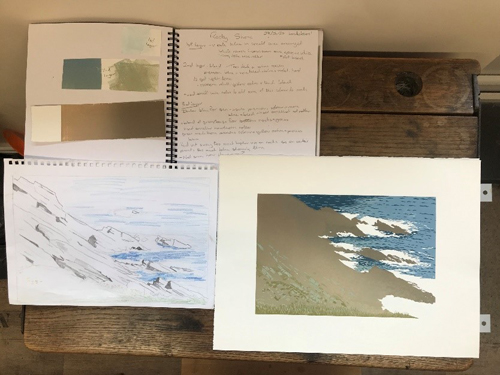
My first reduction print at Handprinted July 2016
Latest finished print March 2020
Why printmaking?
Completely unexpectedly, my daughter’s boyfriend (now my son-in-law) gave me a basic lino-cut kit for Christmas 2013. I had fun over the holidays playing around with it and gradually became hooked. Until then I’d been doing a lot of botanical art and it surprised me to discover that the precision needed for that easily transferred to lino cutting. My only experience of printing up to then was a bit of linocut at school and things like potato printing with children.
What I love about reduction printing is the unpredictability of it, and how until the final layer is revealed, you never know quite how a print is going to turn out.
Where do you work?
In my studio, converted from the back half of a single garage attached to our house. Good job nobody nowadays seems to use a garage for their car. Until we moved here in 2018, my studio space consisted of a large barn attached to our house in France, which meant whenever we went to France, I spent most of my time in the barn! Trouble is now when we go to France, I miss my studio in England and there’s only so much printmaking equipment I can take back and forth. Although I’m lucky to have a small press there too.
Describe a typical day in your studio.
Well, other commitments allowing, I get out in my studio as soon
as I can. If I’m working on a print, I’m afraid time just disappears and apart
from regular cups of tea I might be out there all day. I sometimes have to
force myself to take a break or go for a walk, often so I can just think
through the next stage. I love going out into the countryside, especially
nearby nature reserves, to sketch and take photographs. I started using
Instagram last summer and have found myself a bit hooked, mainly because I’ve
always photographed my printmaking process as I go along and it’s nice to be
able to share that and feel part of a community. Admin, including updating my
website, is one of my least favourite jobs.
I also open my studio to visitors whenever I can, but at the moment with being under lockdown due to the coronavirus, sadly that’s not possible. I find the opinion of visitors really valuable when I’m printing and it’s nice to have someone to discuss ideas with instead of having to rely upon my long-suffering partner.
How long have you been printmaking?
I received a basic kit for Christmas in 2013, but printing in earnest
since 2016.
What inspires you?
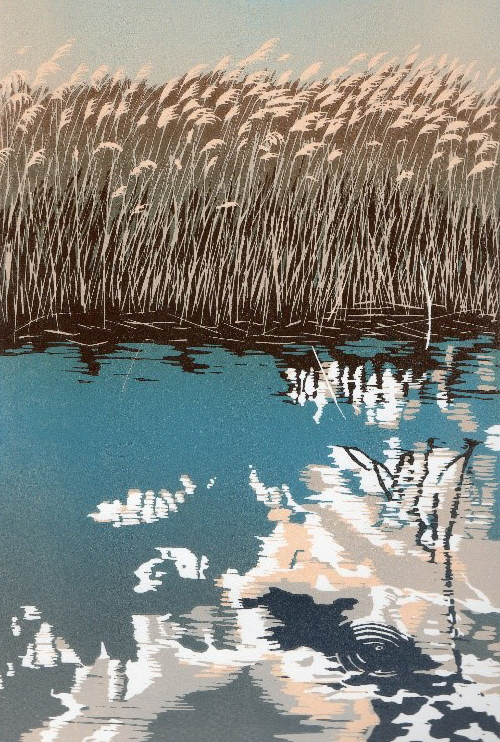
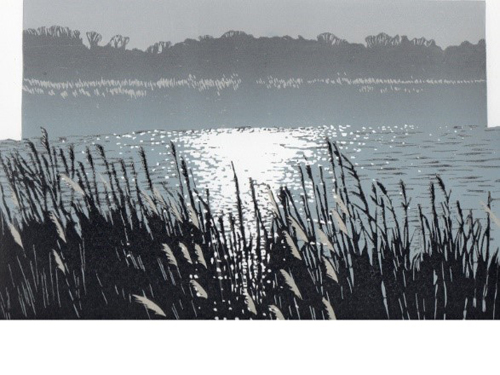
My inspiration comes from nature, the countryside around me and other places I have visited. Lately I have been fascinated with the reeds and birdlife on the nearby fens. I also love capturing reflections in water.
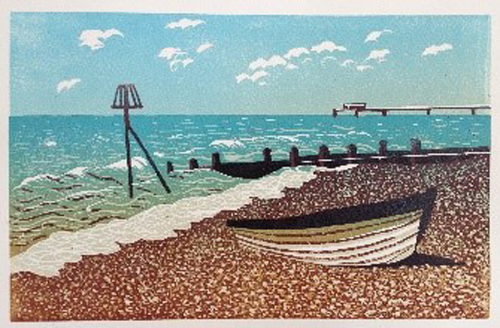
Another tricky one. I feel proud when I find that people like my prints enough to want to buy one. The print I think I am most proud of it this one, which I wasn’t sure about at first, as it wasn’t quite what I intended, but now I’m really pleased it. What annoys me though, is that it was an even smaller print run than normal and I didn’t keep one for myself.
Where can we see your work? Where do you sell?
My favourite place to show my work is in my own studio, but my work is also available to buy via my website www.gill-thornton.co.uk . I usually take part in local exhibitions and some art fairs and display my work in various local galleries and venues. I take part in Norfolk Open Studios and also give demonstrations to local groups. Currently, to the coronavirus restrictions, this is all a bit limited so I’m looking into the likes of Artfinder and Big Cartel. You can also find me on Instagram Gill.Thornton.Art and Facebook.
What will we be seeing from you next?
There’s still a lot of techniques I want to explore, including jigsaw linocut and fabric printing. I particularly want to try mud-resist printing on fabric as this is something I tried during a recent trip to India. The print I’m currently working on is a seascape based on a sketch from a holiday in Shetland.
Do you have any advice for other printmakers and creatives?
Go for it! Do what you enjoy and if something doesn’t quite work
out the way you expected, learn from it, and use Handprinted!!
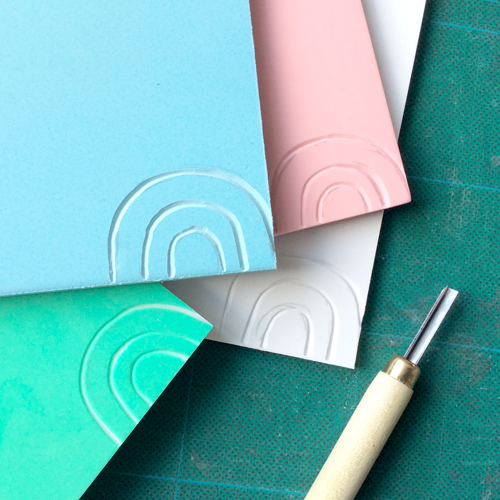
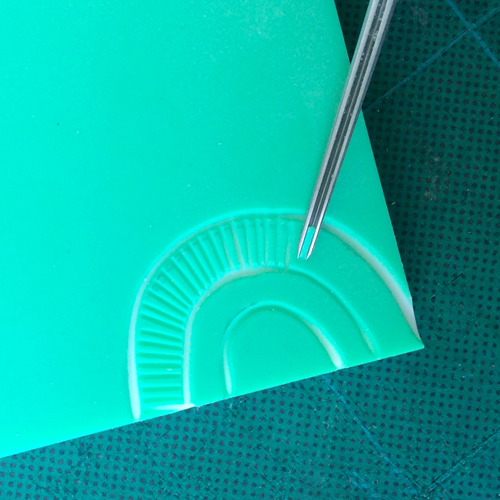
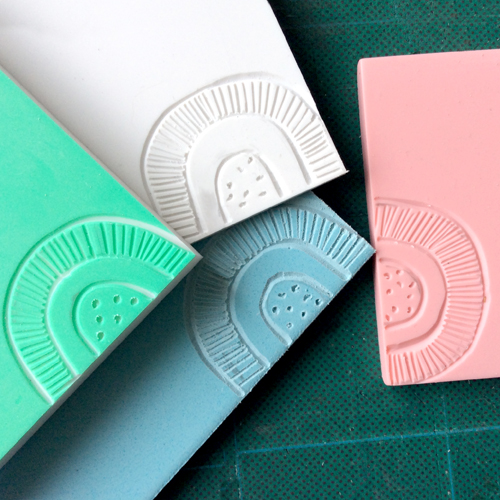
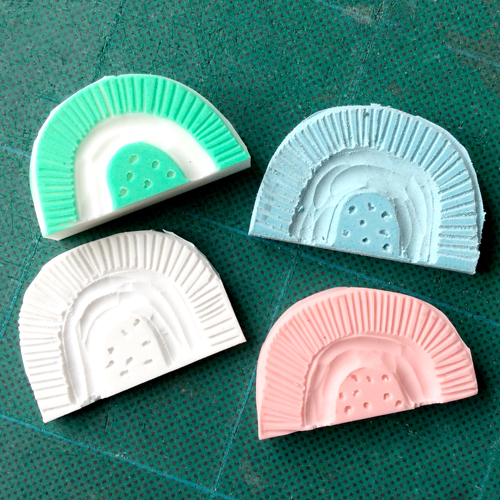
There are lots of different blocks available to make your own stamps. Unlike linocut blocks, stamp blocks are designed to be cut into smaller shaped pieces. We have tested four of our blocks to help you decide which is the best block for your project and budget: Pink Speedy Carve, white Mastercut, blue Speedy Cut Easy and green Japanese Block.
It’s easy to use a pencil to draw on all four of the stamp materials.
We used the V tool from the Japanese Cutting Tool Set to carve out the lines. All four blocks were very easy to cut. The blue Speedy Cut Easy feels the softest but none of the blocks requires any effort to carve.
The pink Speedy Carve and white Mastercut are a little stretch when carving near the edges of the block whereas the blue Speedy Cut Easy and green Japanese Block remain stable all the way to the edges. The green Japanese Block has a white centre which can make it clearer to see the carved lines.
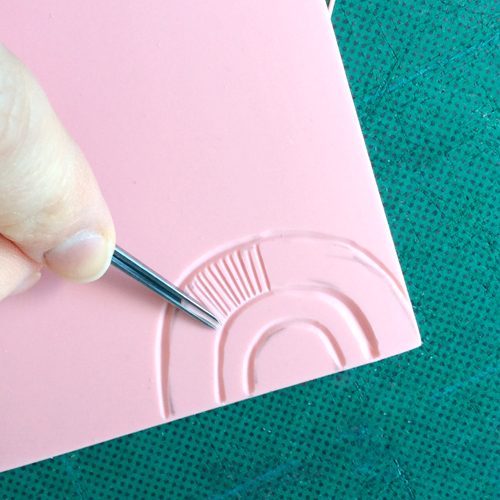
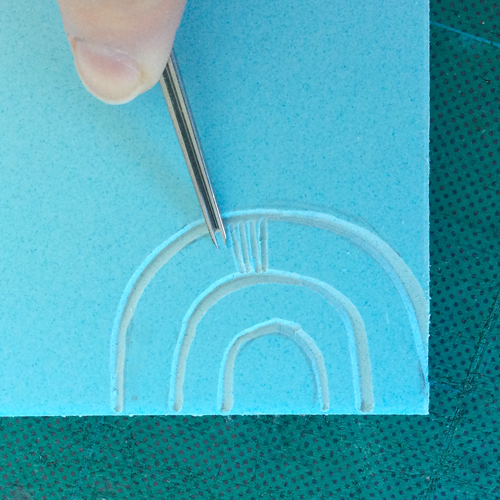
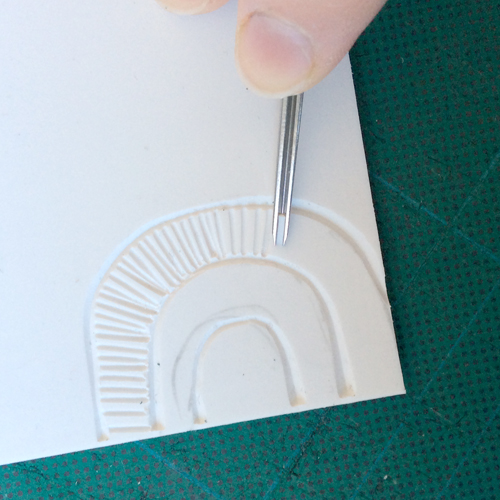
Next, we used a Pfeil 11/1 tool to carve fine lines. This tool is fantastic for tiny detail.
The pink Speedy Carve enabled really tiny lines to be cut. The edges are smooth and clean. The corners were a little trickier to cut as the material began to stretch a little. This didn’t affect the design too much though.
Next, the same detail was carved into the blue Speedy Cut Easy. It was trickier to cut very fine detail as the material is slightly more crumbly. The edges of the tiny lines are a little less clean and a little fluffy.
The white Mastercut cut well with the tiny gouge. It was tricky to get the detail as fine at the edges of the block where it began to stretch a little. The edges of some of the lines became a little fluffy and less clean than the pink Speedy Carve.
The green Japanese Block carved beautifully with no stretch. This enabled very fine detail to be cut right to the edges.
Next, we used the 11/1 Pfeil Tool to carve tiny dots into the blocks. By rotating the block underneath the tool, a dot can be cut.
The pink Speedy Carve cut easily. The tool slid a little on the block so the result was little curls rather than round dots but they were very clean and neat.
The blue Speedy Cut Easy stretched a little when carving the dots so the results were not very neat.
The white Mastercut was tricky to control when carving a dot so the marks left were a little erratic.
The green Japanese Block cut dots perfectly leaving clean round holes.
The final areas to carve was the centre, which was cleared using a large U gouge. The centre cleared very easily on all four of the blocks. The green Japanese Block was the cleanest to carve, leaving a smooth texture. The other three blocks need a little neatening, especially at the edges. The blue and white were a little fluffy, the pink was lovely and smooth like the green block.
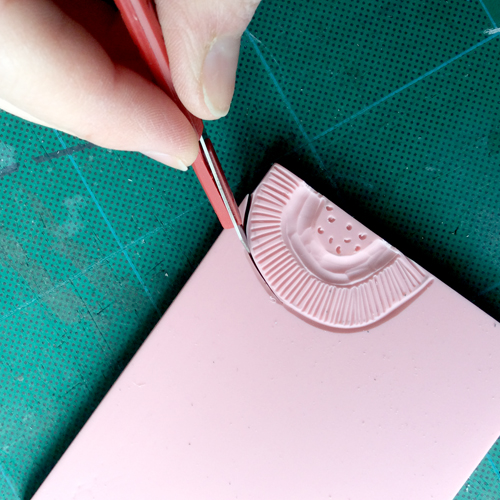
When the stamps were carved, it was time to cut them out. All of these blocks can be easily cut using a scalpel.
The pink Speedy Carve and white Mastercut were easily cut using just one swipe of the scalpel. The blue Speedy Cut Easy took one or two swipes to get through the material. The green Japanese Block took two or three swipes to get through the block. The Japanese Blocks are thicker than the other three.
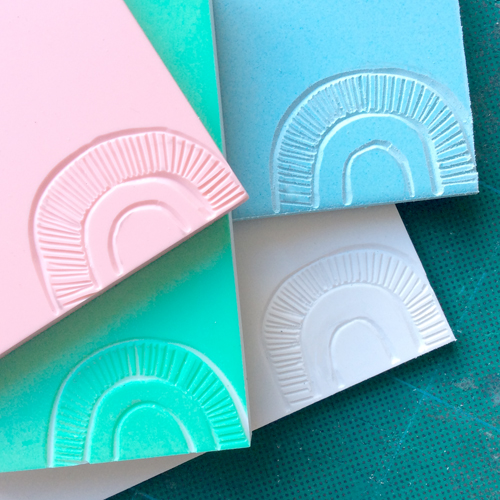
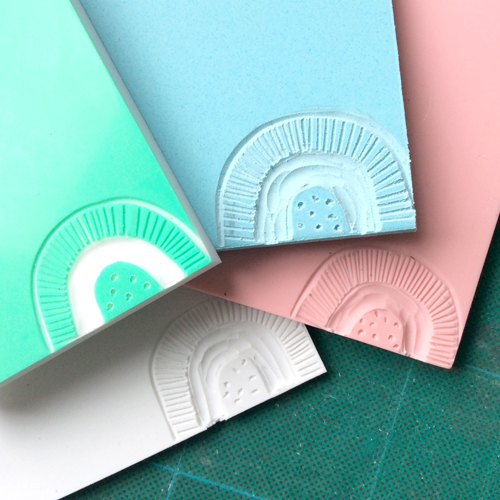
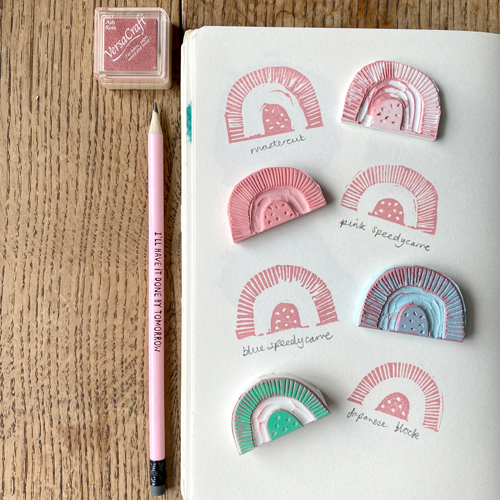
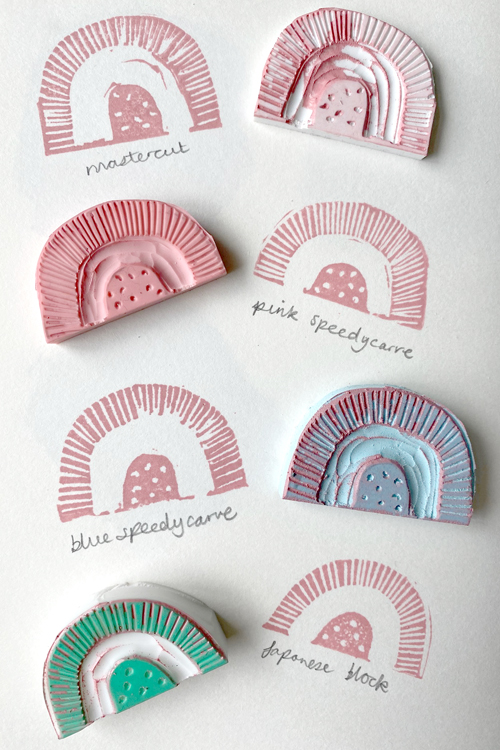
All of the stamps can be printed easily. We used Versacraft Ink Pads on paper. Placing the stamp on the table and dabbing the pad on top is the easiest way to ink up and allows for small pads to be used for large blocks.
The green Japanese Block is the thickest, making it easiest to pick up and print with. The white Mastercut block is the thinnest and so is possibly a little messier and more fiddly to print with. The prints below show that the Mastercut, Speedy Carve and Speedy Cut Easy need a little more neatening is the cleared out area, especially at the edges. A scalpel can be used to trim the raised edges a little so they won’t pick up ink. The clarity of the pink Speedy Carve and Japanese Block is the neatest. The Speedy Cut Easy and Mastercut are a little fuzzier, though they all print beautifully!
Here’s a little summary of our findings:
White Mastercut – very easy and quick to cut, a little stretchy at the edges, carved lines can be a little fluffy here and there. The thinnest of the blocks. Very inexpensive. Available in packs of two in four sizes including a large block which can be cut up to make many stamps.
Pink Speedy Carve – carves easily and clearly, very fine detail is possible, stable to cut but a little stretchy at the edges, smooth cut texture with neat lines. A little more expensive. Available in three sizes including a large block which can be cut up to make many stamps.
Blue Speedy Cut Easy – very soft and very easy to carve, a little crumbly on occasion, trickier to achieve fine detail, slightly fluffy cut marks. Inexpensive. Available in three sizes.
Green Japanese Block – easy to cut, doesn’t stretch at all, white centre makes it easy to see where has been cut, smooth cut texture and neat lines. A little more expensive. Thicker block makes it a little trickier to cut through with a scalpel but easier to hold to print. Available in two sizes (larger size is yellow).