The best thing about printing with Gelli Plates is how fast it is to create a bundle of fantastic textures and designs! But what do you then do with all these lovely prints? Here’s a project that is a great way to use all your gelli prints to create something lasting.
Here’s how we made our Gelli Printed Decoupage Stool:
We are using our 8×10″ Gelli Plate but for a project like this you could use any size or shape. Squeeze a little acrylic paint onto your plate.

Roll out your paint onto the plate. You want an even thin layer. Too much paint will be squelchy and produce messy prints.

Create different textures on your plate by pressing, scraping and drawing into the paint (be careful not to use anything sharp that will damage the surface).Try using bubble wrap to get polka dots:

Peel off the bubble wrap to reveal your texture.

We’re using Logan Paper to print on – a translucent deli paper that’s loved for Gelli printing and perfect for decoupage as it is beautiful when layered. Place your Logan paper over your plate and rub with the flat of your hand.

Peel off your paper to reveal your print!

You can take a second print from the plate to remove any excess paint. You can get some really lovely and unexpected prints this way. I used the leftover paint to print on the unprinted strip of paper on the side.

Place your paper to one side to dry.
Add more paint to your plate (without having to clean it first!) and roll it out again ready for the next texture. Try corrugated cardboard:


Add a few blobs of paint in another colour and roll it out.

This time we’re using some sequin waste and a scraper to make marks.


Experiment with blending colours on your plate!


When you have a pile of prints with a variety of patterns, clean your plate. You can use a baby wipe or a damp cloth to remove any excess paint. Store your plate back in its case with its protective plastic covers.

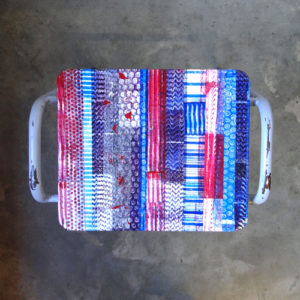
Here our stool ready for its makeover.

We applied a quick undercoat of white paint.

Gather together all of your prints.

We cut ours up into strips but you could choose any shape.

Put a little Mod Podge on a foam brush.

Apply it to a section of your surface.

Take a piece of print and stick it down. Use your hand to flatten out any wrinkles and the foam brush to push down the corners.

Keep adding areas of Mod Podge and layering up prints. Most of the prints will be translucent and you will be able to see partially through to the layers underneath to create new colours and patterns. We used only red and blue paint so we could make purple when overlaying prints.

When you are finished layering and are happy with how to looks add a final thin layer of Mod Podge over the top as a sealant. Make sure to go round all the edges to tuck any loose bits round. I had to patch a few bits on the side where I had left gaps.

To have a go yourself you will need:
- Gelli Plate
- Acrylic paint
- Logan paper
- Roller
- Materials for textures such as bubble wrap and corrugated card
- Tools such as paint scrapers
- Baby wipes or damp cloth
- Stool or other surface to decorate
- White paint for undercoat
- Scissors
- Mod Podge
- Foam brush