My name is Rob Luckins I’m a printmaker and commercial photographer. I make screen prints, letterpress and linocuts under the name Triffid. My inspiration
comes from 1950’s television shows and packaging. I love old tin toys, model kits and the 1950’s view of what the future would look like.
Describe your printmaking process.
My printmaking process is screen printing. The way I approach a piece is to create a very small sketch roughly the size of a small matchbox to work out
composition, I’ll then shade this to work out roughly where I want light, shadow and texture. I then scan this and drop it into Adobe Illustrator and
block out all of the shapes. From here the artwork goes into Adobe Photoshop where I texture it and create my final separations ready for printing.
How and where did you learn to print?
We had a 1-day introduction to screen printing at University, but it wasn’t until I saw the work of Peter Lloyd and his series Royal Rumble that I got
really excited about what could be achieved using the process.
Why printmaking?
There’s something deeply satisfying about the whole process that I’ve never gotten from painting. The ability to lay down perfectly flat colours and layer
something up is something that really appeals to me.
Where do you work?
I work and teach at Badger Press, which is an open access printmaking studio situated in Bishops Waltham in Hampshire. I also have a small set up at home.
Describe a typical day in your studio.
Get in early, get all of the screens coated, exposed and washed out, cut paper and mix up inks. All peppered with plenty of tea drinking.
How long have you been printmaking?
Since 2001 when I worked as a commercial screen printer, printing t-shirts.
What inspires you?
People who are passionate and proactive about what they do, people like Lord Lav, Curxes and Tom and Emily over at CreatureHut who are all friends of mine
and fit the above description perfectly.
What is your favourite printmaking product?
I would probably say well used wooden handled squeegees that are splattered with paint.
What have you made that you are most proud of?
Apart from my two boys, I would say my most recent piece featuring a 1980’s style gumball machine.
Where can we see your work? Where do you sell?
You can see my work over at my Etsy store www.etsy.com/uk/shop/TriffidPress where my work is also for sale. It is also available for sale at Aspex gallery in Gunwharf Portsmouth and on the wall of the Butchers Hook micro Brewery
in Southampton.
What will we be seeing from you next?
I am working on an A2 piece of a pinball machine and plan to produce a new series of letterpress prints.
Do you have any advice for other printmakers and creatives?
Don’t feel like you have to have access to expensive equipment in order to get started and if you’re unsure about a process, reach out to printmakers and
ask them questions. I would highly recommend attending courses and talks and don’t be afraid to get your hands dirty. It’s the best way to learn!
Our Christmas Makers’ Market is just around the corner! We have an amazing selection of makers selling a variety of handmade goods including prints, paintings,
glass, homewares, jewellery, cards and pottery. This is the perfect opportunity to shop local and support independent makers this Christmas.
The Makers’ Market will be open on Friday 30th November from 6-8.30pm and on Saturday 1st December from 10.30-4pm at Handprinted in Bognor Regis. Entrance
is free – please pop in. Here’s a sneak peek at who will be there:
Bobbie Print – A stylish selection of screen prints, riso prints, cards, notebooks and enamel pins.
Vicky Gomez – Mixed media prints, greetings cards and postcards, tote bags and notebooks with a sea life theme. Plus, some new Christmas
themed prints!
Lin Crompton – Bags, scarves and other handmade items.
Felix & Tabitha – Lots of arty, crafty loveliness: glass and textile gifts, cards, décor and jewellery with a whimsical twist. Handmade
by the sea in sunny Bognor.
Please come along to our Christmas Makers’ Market on Friday 30th November from 6 – 8.30pm and on Saturday 1st December from 10.30am – 4pm
at Handprinted, 22 Arun Business Park, Shripney Road, Bognor Regis, PO22 9SX.
Hi, I’m Katie Edwards and I’m a freelance illustrator and screen printer, I produce conceptual illustrations for a wide range of international clients
from editorial to advertising. I also sell screen prints online, in galleries and at art shows.
Describe your printmaking process.
Using traditional photographic and silkscreen printing techniques. Focusing on metaphors and symbolism, reflecting enjoyment for the natural world, evoking
thoughtfulness and humour.
How and where did you learn to print?
I first tried my hand at screen printing on my art foundation course, I’m pretty sure I loved the process from the get go. Then at University where I studied
Graphic Arts and Design, if I wasn’t in the printmaking studio I was in the darkroom developing my photos onto lith film to make my screen from. My
way of working came from a love of photography and screen printing.
Why printmaking?
I find all printmaking techniques extremely satisfying, that moment you reveal the print is very pleasing every time. Screen printing appealed to me because
it could be combined with placing photographs in unusual compositions and I enjoy the printing process, other techniques can be very laborious. The
planning and set up of screen printing can take some time, but once your ready to print it can be fairly quick and enjoyable, producing unique textures
every time.
Where do you work?
I work from my home studio in Newby Bridge, The Lake District.
Describe a typical day in your studio.
I don’t really have a typical day, it depends what project I’m working on and at what stage. It varies from generating ideas for a commission, creating
the design, planning the colours and layers. If I’m printing a limited edition print run, I’ll be exposing screens and printing. Or if I have an exhibition
coming up I’ll be preparing frames and mounting prints. Then there’s all the nitty gritty stuff, such as paperwork and packing online orders that need
doing in between and goes hand in hand with running a business.
How long have you been printmaking?
14 years
What inspires you?
Growing up in the Lake District and spending some time in Canada, I’ve been closely in touch with the outdoors, the countryside and animals. My screen
print illustrations reflect this appreciation for natural beauty, yet sometimes mixed this with familiar cityscapes. My style of illustration came
about from the juxtaposition of different objects to communicate a new idea. This way of working appealed to me in a way that I could create quite
imaginative pieces with quite ordinary photos. I didn’t consciously always include an animal or nature in my pieces, but this was what I was interested
in and so were the basis of my ideas. Animals also hold so many hidden meanings and so often create a symbolic image.
What is your favourite printmaking product?
My exposure unit, it’s not a full-size one: I can only fit up to an A2 screen, but it fits perfectly in the corner of my studio. It was a game changer
having to not go to a workshop to expose my screens and a must when I moved from the city back to the countryside.
What have you made that you are most proud of?
‘Joy’ was for a competition of the same title, which I struggled with an idea for a little while but when I thought of the horse escaping the carousel
it was a real ‘Aha’ moment. Also ‘Think Big’ is my biggest selling edition.
Where can we see your work? Where do you sell?
I sell on my website https://ktedwards.co.uk in galleries across the country and at Art Fairs.
What will we be seeing from you next?
This year I have been working with the Apartment Hotel chain Roomzzz and there’s lots more to come from this exciting partnership.
Do you have any advice for other printmakers and creatives?
My way of working came about in my final year of University, I think before then I’d tried too hard to create a style. When actually it should come naturally
by doing what you love, in my case combining photography and printmaking, my two passions. And enter competitions, they are great for getting noticed.
Choosing the right roller for your relief printing can get confusing. Different uses, budgets, sizes and preferences can dictate which roller is best for you. We’ve put together a guide to lino rollers to help you choose the best roller for you. This guide has now been updated to include all of the rollers we now offer.
There are several factors that decide how a roller will perform:
There are hard rollers and soft rollers – hard rollers will ink up less of the ‘noise’ n the carved areas but can leave roller marks at the edges, soft rollers can roll ink more evenly but can deposit more ink in the grooves. Soft rollers can be especially useful when the roller is narrower than the block.
The circumference of a roller can affect your inking – the larger the circumference, the more ink it can put down in one roll.
Rollers come in different widths – it can help to have a roller that is slightly wider than the block you are inking. This can help with even inking without roller marks. If printing in a rainbow roll, you’ll need a roller as wide as your gradient area. Smaller rollers can be useful for inking up small areas of lino or ‘free inking’ in a more painterly style.
There are also rollers that can be used for block printing onto fabric as they allow other inks to be used.
Read on for a comprehensive list of all our rollers…
These little rollers come in two sizes: 60mm wide with a circumference of 6.5cm and 90mm wide with a circumference of 10cm. The wire handle provides a stand to keep the roller off your inking plate. Although they may not be the best roller for inking up large-scale linocuts, these little wire handled rollers are a great addition to your lino kit. The rubber has a slight give in it, making it easier to roll without pecky roller marks.
They’re inexpensive, easy to clean and can hang neatly in on your workshop wall. Particularly good for small relief prints for cards or for free inking smaller sections of larger prints. They’re easy to move around curves and make great shaped rainbow rolls:
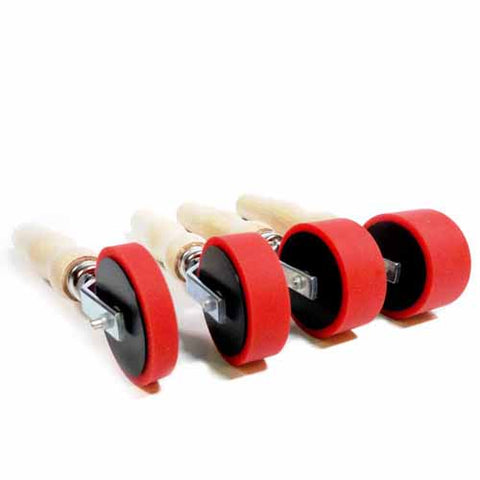
These red lino rollers are a classic. Many people’s first relief printing experience is with one of these rollers. They come in a variety of widths, from 50mm to 200mm and have a 10cm circumference.
They are inexpensive and are therefore a great entry-level roller. The roller is hard so will not deposit ink in the recesses of your block but may cause roller marks if the block is wider than your roller. They can be turned over to keep the roller off the inking plate.
This is the blue handled version of the roller above but the rubber is a lot softer. This can make it a little easier to use. There are several widths available: 50mm, 75mm, 100mm, 150mm and 200mm and they have a circumference of 11.5cm which is a little wider than their red-handled counterpart. Like the red rollers, they can be turned over so that the roller is kept away from the inking plate.
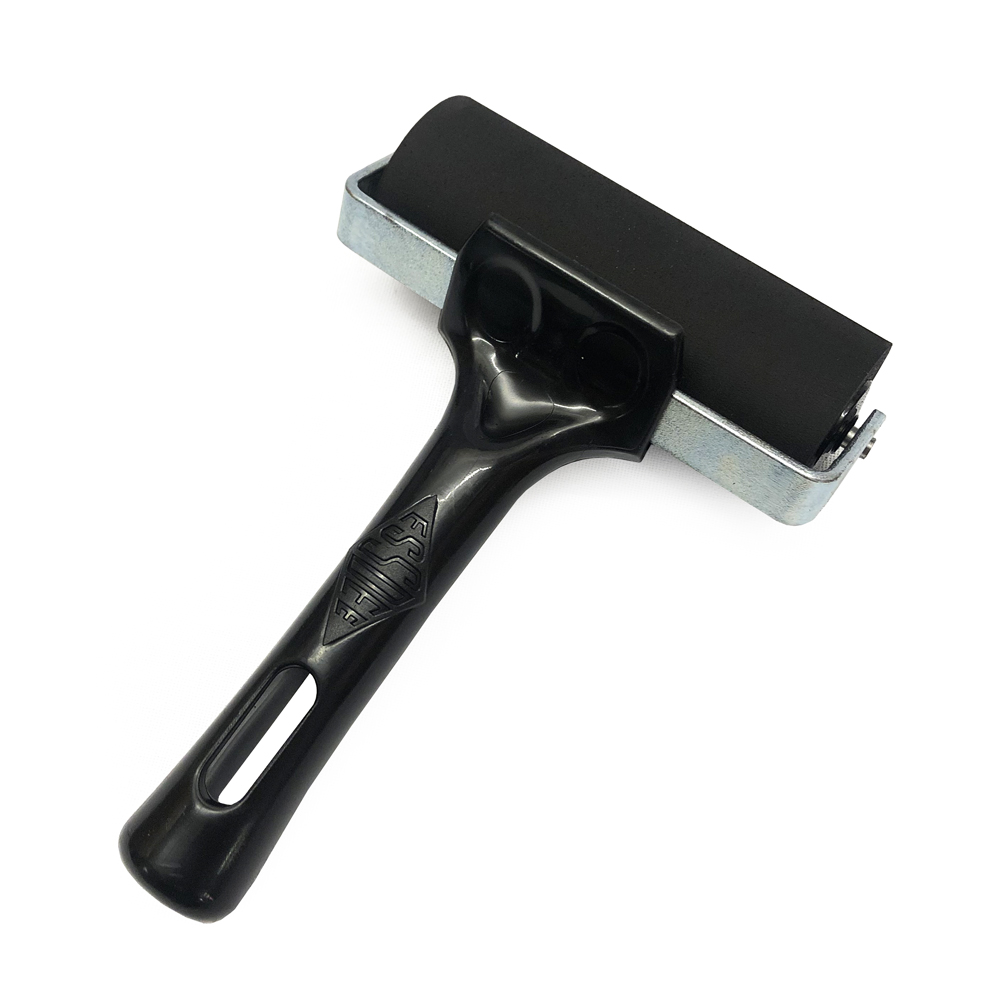
This black-handled roller is a heavier weight than the red and blue handled alternatives. It has a medium hard rubber but with a slightly rougher texture than the red and blue rollers, allowing for a more even distribution on ink. The rubber is thicker than the red and blue rollers above.
Available in two sizes 50mm and 100mm with a 12cm circumference.
This soft rubber roller by Speedball has a ‘pop in’ mechanism so the roller can be separated from the handle for cleaning. They are 10cm wide and have an 11cm circumference.
The roller is soft, allowing for even ink distribution but they can become a little sticky after being cleaned with solvents – this does not affect their use. When turned over, the rollers rest of their plastic stand and so the roller is held away from the inking plate.
This Deluxe Rubber Roller from Speedball comes in three widths: 1.5″, 4″ and 6″ and has a 10cm circumference.
The rubber is soft for even ink distribution but, like the Speedball Soft Rubber Roller, can become when sticky after being cleaned with solvents. Again, it doesn’t affect its use so is thankfully not an issue. Turn it over to keep the roller away from the inking plate.
The 1.5″ roller is particularly popular as it can be used for free inking for more painterly linocuts or small detail.
These wooden handled rollers are available in eight widths: 9mm, 15mm, 20mm, 25mm, 60mm, 120mm, 150mm and 200mm. They have a wide circumference of 16cm allowing ink to roll out more ink before the surface of the roller touches the block twice.
They are relatively inexpensive and are made from a thinner tube of rubber around an aluminium core. The rubber has a little give in it making them a pleasure to use.
The wide range of widths of these rollers makes them a unique addition to your printmaking kit. The more narrow rollers allow for very fine detailed inking and free inking whilst the large circumference spreads ink further.
The larger rollers can be turned upside down to rest on a stand, keeping the roller off the inking plate. The more narrow rollers do not have this feature.
This pin roller is a different style than the others – it has one handle on each end like a rolling pin. It’s 300mm (12 inches) wide with 5mm thick rubber and a circumference of 16cm.
It’s strong and hard-wearing and has an aluminium core that rotates through plastic bearings (handles rotate independently from roller allowing for easy inking). The price of this roller is extremely reasonable compared to other pin rollers on the market.
These Japanese Hard Rubber Rollers are lovely to work with. They are available in four widths: 30mm, 100mm, 165mm and 210mm. They have a wide circumference of 15cm allowing you to roll out your ink evenly over large areas. The hard surface of the rubber means that less noise is picked up from the background when inking. This is a high-quality roller, especially for the price.
These rollers have a plastic handle and metal frame. The rollers can be turned upside down to rest on the frame, keeping the roller off the inking plate. The rollers rock a little from side to side on their spool but this doesn’t affect their use.
The rollers come boxed separately from their handles (with the exception of the 30mm which comes ready-made) but are easy to put together.
These Japanese Soft Rubber Rollers are of equally high quality with thick rubber. Like the Japanese Hard Rollers, they are available in four widths: 30mm, 100mm, 165mm and 210mm. They have a wide circumference of 15cm allowing you to roll out your ink evenly over large areas. These rollers have a softer rubber surface, making it easier to roll evenly without roller marks. This is another high-quality roller, especially for the price.
The Soft Rubber Rollers have a wooden handle and metal frame. Unlink the Hard Rubber Rollers, they cannot be turned upside down to keep the roller off the inking plate but rather have a ‘leg’ to hold the handle out of the ink. The exception to this rule is the 30mm roller which has a red plastic handle, not a wooden one, and can be turned upside down to rest off the inking plate.
The rollers rock a little from side to side on their spool but this doesn’t affect their use.
The rollers come boxed separately from their handles (with the exception of the 30mm which comes ready-made) but are easy to put together.
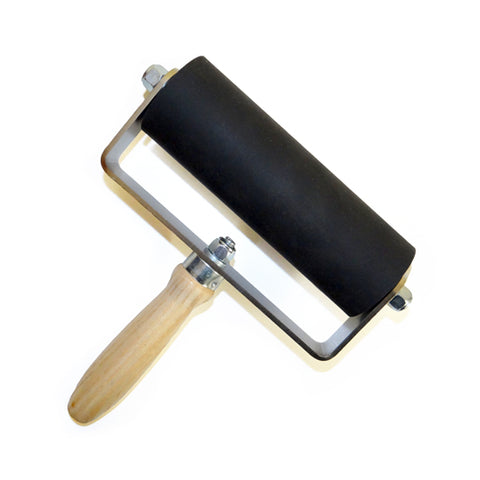
This Hawthorn Inking Roller is a great all-rounder. It comes in 3 sizes: 3″, 6″ and 12″ wide, has an impressive circumference of 17cm and is reassuringly heavy. The rubber is soft and inks evenly. When turned over, it rests on a stand to keep the roller off the inking plate. This is a high-quality roller, especially for the price.
The frame features a stand to keep the roller off the inking plate when flipped. The stand can vary a little – some batches of rollers have a third leg at the base of the handle to hold the handle away from the inking plate too.
Sponge rollers are a really useful bit of kit when you’re wanting to print your lino designs onto fabric. They’re very inexpensive and refill sponge rollers can be fitted to the handle when they’re worn out or to swap to when the first is wet.
They’re roughly 10cm wide and have a circumference of 15cm. The smoothness of standard lino rollers means that only block printing inks will roll out evenly – other inks will cause the roller to slip. Using a sponge roller allows other inks and paints to be rolled out. For example, fabric screen printing inks can be easily rolled out with a sponge roller and then used to print lino blocks onto fabric.
These sponge rollers do soak up a lot of ink and can leave a bubbly texture on the blocks.
We have had this roller specially made to be perfect for block printing onto fabric. Like the sponge roller, it allows you to roll out slippery fabric screen printing inks but this roller creates a more even texture. The ink goes further as none is soaked up into the roller.
The Textile Roller is approximately 10cm wide and has a circumference of 10.5cm.
I’m Turid, I live in West Sussex. I’m a mum of three teenagers and owner of two cats and a nutty spaniel called Peggy. I was a teacher then children’s
counsellor, but gave that up a few years ago, and took the plunge with setting up a small business. Now I’m lucky enough to balance family life, and
a part-time job, with working from home drawing, designing and printing fabric, and hand making linen products.
Describe your printmaking process.
I’m a lover of pattern in nature and take lots of photos as I walk. So I generally start with a photo (normally something botanical), which I then sketch
in pencil, and then once I’m happy with it I draw over in ink. I scan this into my computer and do final adjustments in photoshop, and eventually print
it out on acetate. I coat a screen with photosensitive emulsion and once dry, expose the image (I simply use a 500W lamp with the glass removed) –
I wash the screen off and, assuming all is well, then it’s ready to print.
How and where did you learn to print
I’ve always been interested in lots of different forms of printmaking but only had a go at screen printing a few years ago – I was given a gift from my
husband of a short course at Inkspot Press in Brighton, with Jane Sampson. I instantly loved it, and have been playing around with it ever since!
Why printmaking?
It’s a lot of fun! I love that with screen printing you can print detail. I worked with stencils initially but was a bit frustrated by it, and found that
once I could in effect print my ink drawings I enjoyed it all the more. I’m excited at the prospect of learning loads of new techniques. I’m just at
the start but raring to go!
Where do you work?
I’m very lucky to have a studio in my garden where I work. It’s insulated but gets seriously chilly in the winter, so I tend to migrate to my kitchen when
it’s cold for the designing and sewing process, and just soldier on in the cold for the printing part! I expose the screens in a makeshift darkroom
that is my daughter’s bedroom (she is now at university, and it’s the smallest and darkest room in the house!) and my poor utility room is where I
coat and clean the screens (lots of evidence of this on the floor!).
Describe a typical day in your studio.
The only typical bit to my day is that I always go for an early dog walk, and make myself coffee and toast on my return. I have weeks when I’m designing
and screen creating – this can be a rather slow process as it’s often that it’s not til the screen is made and the first print produced that I know
if I’m happy with the design, so it may mean going back to the sketch and redrawing it and starting the whole process again. I am still learning about
what mesh count is best with what design and also with what fabric. Some of the finer detailed designs don’t print so well on the linen as the weave
is too coarse.. so I’m experimenting all the time. I have days when I’m mainly washing, drying, cutting or printing the fabric, heat setting the prints,
sewing the products, creating lampshades, or any combination of the above!
I’m largely self-taught, and so I’m still very much learning as I go along, so I’m often trying things out and making mistakes and trying again, so things
tend to develop rather slowly, but it’s very satisfying when things go well…
How long have you been printmaking?
I only began screen printing a few of years ago, and feel really excited about all I have still to learn. At the moment I mainly print simple monochrome
designs, but I’m keen to start introducing more colour and layers.
What inspires you?
I guess I’m mainly influenced by nature…Living at the foot of the South Downs, I’m surrounded by trees, fields and hills – it’s very inspiring and
it would be impossible not to be influenced by it! However, I’ve also spent a lot of time in Norway (my mum’s Norwegian) – and I think you can’t fail
to be influenced by Scandinavian style and design when you spend lots of time there.
What is your favourite printmaking product?
I think my favourite product at the moment isn’t strictly a printmaking product, but it is very important in the fabric printing process… it’s my
heat press. Before I got it, I spent so long neurotically ironing every print for far longer than was probably necessary, for fear of it vanishing
in its first wash… I can relax a little more now that I’m confident it will remain!
What have you made that you are most proud of?
I think this will be my Norwegian Forest design, simply because it was the first design that I printed on to fabric, created a cushion from, and was confident
enough to sell!
Where can we see your work? Where do you sell?
I sell in Lewes at the monthly Saturday craft market, and on my Etsy shop (kviladesign.etsy.com).
I also sell in the local Artist Open Studios and will be at a number of Winter and Christmas markets in Sussex. My website will be launched in the
near future (www.kviladesign.com ).
What will we be seeing from you next?
I’ve recently started printing fabric for lampshades, and I’m really excited about some new bold designs, these will be ready in time for Christmas!
Do you have any advice for other printmakers and creatives?
When transferring designs to a block, there are several factors to consider: can the design be seen on the block? Will it wash off? Will the design
be transferred to the print? In this project, we test two different carbon papers on six different relief blocks. We test them with three types of
ink: waterbased, water washable and oil based to see which combinations work the best.
Our first test is to see which carbon papers transfer onto which blocks.
Both the red and the blue carbon papers transfer well onto the ply and the grey lino.
Only the red carbon paper transfers onto the softcut, transparent block, easy carve and vinyl. The blue does not show on any of these blocks.
The next test is to see if the marks can be cleaned off. Often, especially when printing in the reduction method or proofing, we want to clean the ink
off our blocks without removing our drawing. Other times, we may want to clean the drawing off our block to start again, so it’s important to know
how our carbon papers will behave when cleaned.
When cleaned with water on a rag:
Softcut – the red lines smudged
Transparent Block – the red lines cleaned away
Ply – the red lines did not clean off, the blue lines did not clean off
Easy Carve – the red lines did not clean off
Lino – the red lines did not clean off, the blue lines cleaned away
Vinyl – the red lines did not clean off
When cleaned with oil on a rag:
Softcut – the red lines cleaned away
Transparent Block – the red lines cleaned away
Ply – the red lines smudged, the blue lines smudged
Easy Carve – the red lines cleaned away
Lino – the red lines did not clean off, the blue lines did not clean off
Vinyl – the red lines cleaned away
When cleaned with Zest It on a rag:
Softcut – the red lines cleaned away
Transparent Block – the red lines cleaned away
Ply – the red lines smudged, the blue lines smudged
Easy Carve – the red lines cleaned away
Lino – the red lines became paler but did not clean off, the blue lines cleaned away
Vinyl – the red lines cleaned away
It was worth noting that it was difficult to redraw on the block with carbon paper after they had been cleaned with Zest It.
Next, we want to test if the carbon lines will transfer when printed. We re-drew on all the blocks and printed with Cranfield Waterbased Relief Inks, Caligo
Safe Wash Inks and Hawthorn Stay Open Oil Based Inks.
The results from each ink can be seen in the prints below:
When printing with Caligo Safe Wash Inks:
Softcut – no transference
Transparent Block – transference from red carbon paper (blue carbon paper did not work on block)
Ply – no transference
Easy Carve – no transference
Lino – no transference
Vinyl – no transference
When printing with Hawthorn Oil Based Stay Open Inks:
Softcut – no transference
Transparent Block – transference from red carbon paper (blue carbon paper did not work on block)
Ply – no transference
Easy Carve – no transference
Lino – no transference
Vinyl – a tiny amount of transference from red carbon paper
When printing with Cranfield Water Based Inks:
Softcut – transference from red carbon paper (blue carbon paper did not work on the block)
Transparent Block – transference from red carbon paper (blue carbon paper did not work on the block)
Ply – a tiny amount of transference from red carbon paper, no transference from blue carbon paper
Easy Carve – a tiny amount of transference from red carbon paper
Lino – a little transference from blue carbon paper, no transference from red carbon paper
Vinyl – a tiny amount of transference from red carbon paper (blue carbon paper did not work on the block)
To conclude, we found that the Blue Carbon Paper only works on the traditional grey lino and ply, not on any of the other blocks. The red carbon paper works on every block. Zest-It cleans off both carbon papers off all of the blocks except red carbon paper on lino and ply and blue carbon paper on ply.
There is little transference on any of the prints apart from the red carbon paper on the transparent block.
The best combination seems to be Red Carbon Paper on grey Lino as there is no transference to prints and the marks are not removed with water or oil and are only made paler with Zest-It.
My name is Freya Scott and I am a book binder, photographer and marbler. I work mostly out of a studio in London, but I also work across the country teaching, especially in the West Country where I am an instructor with Bound by Veterans, a charity that helps sick and injured veterans to gain valuable skills and qualifications as well as experience the therapeutic effect of craft.
Describe your printmaking process.
It all starts with the marbling bath. The water-based substance I marble on is called ‘size’ and this needs to be prepared in advance. After a day or so
it is ready, and I can begin mixing inks. They all have their own properties and behaviours, so testing them out can take a while. Once they are all
doing what they should, I use different methods to apply the ink to the surface of the size. The inks can then be manipulated into hundreds of different patterns. Once the pattern is finished, I lay my paper (which has been treated with a solution to help the ink stick to it) onto the surface. The paper is then peeled back and the pattern has been transferred – this is the magical part! After that, it is rinsed and hung to dry.
How and where did you learn to print?
My first marbling experience was when I was about 9 years old with one of those kits you can buy. It wasn’t anything special, but I thought it was marvellous! After that I did a few marbling sessions while I was doing my bookbinding training (I trained in commercial binderies and also with individual bookbinders) but it always frustrated me – there were too many variables, and the method was confusing. When I started teaching with Bound by Veterans, we invited a master marbler to come and do a day with us, and something clicked. After that, I went home and couldn’t stop. I spent months and months testing, improving and developing my style and skills, and I’ve been doing it ever since.
Why printmaking?
There is something entirely magical about making patterns and prints, especially with marbling. At the beginning, everything is a wonder – you never know what you are going to get. As you progress, you realise how much is involved, but once you get to the stage where you can translate an idea in your head into a pattern on the bath, it is worth all the hours of testing. It is absolutely the most wonderful thing for anyone who loves colour, because the colour combinations are endless.
Where do you work?
Most of the time I work out of a studio in south east London, and when I’m not there I’m in the West Country teaching – every now and then I head further afield to teach, which is always good fun.
Describe a typical day in your studio.
Most days begin after a dog walk with my hairy dog child Ludo. He comes into work every day, so the first thing is to get him settled with a nice chew!
After that, I’ll begin work on any orders. I’ll put the radio on and just crack on. Sometimes, if it’s going well, I’ll forget to have lunch. By the
end of the day, if it’s been a marbling day, there’ll be a rack of papers hanging to dry, and I’ll be covered in paint. Ludo too, sometimes. The studio
is in an old factory which has lots of other studios, so there is always someone around to have a cup of coffee with, or generally procrastinate with. I tend to work right up until I can barely stand, so I often leave the place in a bit of a mess. I am determined to become more organised, but I’m
better at making than tidying and admin!
How long have you been printmaking?
In different ways, probably about 10 or twelve years.
What inspires you?
Everything. I take pictures of everything everywhere. Weird shadows, textured walls, random colour combinations I like. The last photo I took was of someone holding one of my blue books and they are wearing bright orange nail varnish. I need to make a paper that is blue with hints of fluorescent orange! If I deliberately need inspiration, I’ll pick up one of my books on colour, or I’ll take a trip to an art gallery. I love looking at other people’s work. It’s also important to me to get away from all the stimulation too – I can only process it all when I’m somewhere quiet and green and leafy.
What is your favourite printmaking product?
Paper. Aside from colour, paper is the thing that really makes a print sing. I love trying different types, and seeing what it can bring to a design.
What have you made that you are most proud of?
I’m usually a bit in love with everything that I make, until I’ve seen it too much, then I hate it. So really the thing I’ve made that I’m most proud of
is my business. I never imagined that I would be able to do it, and (with a lot of support from my partner) I’ve managed to turn something I love into
the thing I do every day.
Where can we see your work? Where do you sell?
I try and put my work in lots of different places, especially where I can interact with people viewing it. I do a couple of pop up shops and exhibitions every year, and I have my work in a few independent shops, but mostly I post my work online, either on my website (where it is for sale) or Instagram. I like to post videos of the process, and see how people react to new designs.
What will we be seeing from you next?
I’m working a lot more on moving into other areas of design. I will never stop making books, but I’m excited to try out my patterns on other things – I’m doing more on leather and fabric, and there is even some wallpaper in the pipeline!
Do you have any advice for other printmakers and creatives?
Meet other makers, and take your work out into the world. Other makers can support you and inspire you, and meeting the people who love your work will spur you on to make more and more. And on that front, never stop learning and experimenting. Take other random classes – everything you do will feed back into your work.
Making a batik is the satisfying process
of layering wax and dye to create bold, intricate designs. The more layers of dye and wax that are added, the thicker and stiffer the fabric will become.
At the end of this process, you’re left with a hard, milky-looking piece of cloth. Here’s how to iron the wax out of your batik to get the vibrancy
back into your designs!
Place a large wad of newspaper onto a board with your batik on top.
Place a single sheet of newspaper over the batik. With an iron on medium to hot, iron over the area of the batik. The wax should start to melt through
the newspaper.
It is advisable to keep a separate iron for this process as it may become contaminated with wax that could transfer onto your clothes.
Please note, if the iron begins to smoke, unplug it straight away and with it still turned off, iron onto a clean cloth to remove any excess wax from the surface of the iron.
When the whole area of the batik has darkened with melted wax, it’s time to change the paper.
Peel the waxy newspaper off the batik. If it sticks, gently heat the surface with the iron to re-melt the wax. Place a fresh sheet on top and continue
to iron, changing the paper each time it fills with wax. You may want to change the top sheet underneath the batik too.
When a fresh sheet of newspaper no longer fills with any wax, the batik is ready! It should look vibrant and be softer to handle. The small amount of wax
left in the fabric brightens and darkens the colour of the dyes (like a grease stain in a piece of clothing).
This technique is perfect for batiks as pieces of artwork in their own right or for lampshades! Please note, batiks that are for garments and soft
furnishings will need to have the excess removed by dry cleaning or dipping briefly in boiling water – please note that this will fade the colour
by removing the ‘grease-stain’ effect of the wax and removing excess dye so do so with caution!
Here’s another sampler batik before and after ironing:
To iron your batik you will need:
Ironing board or hard surface
LOTS of newspaper
An iron (an old or cheap iron reserved only for batik is advisable)
I am a painter and printmaker. I have experimented with pretty much every type of material and process over the years. I always return to painting and
printing though.
Describe your printmaking process.
I am usually a Lino artist. I have returned to etching and lithography this year too. I love the immediacy of Lino. I’m a teacher in a secondary school
and get some time to make my own work in between lessons and marking. Lino is something that I can pick up and put down easily after many years of using it.
How and where did you learn to print?
I did some Printmaking at school which pretty much put me off. I started printing on Foundation Course when I was 18. Mainly lithography and mono printing. I then experimented with etching on my Degree at Wimbledon School of Art in the 80s. They have a great print department.
I went on to do an MA in print at Brighton University.
Why printmaking?
I like the idea of making multiple images. I love the discipline and rigour of the techniques. I think because my painting is all about colour it’s good
for me to make something just in one colour. I’m often asked why I don’t make multi coloured prints. I have no interest in that as it’s something I
already do in my painting.
Where do you work?
I have a studio in Wimbledon. I paint from there. I generally print at school as we have a press there.
Describe a typical day in your studio.
There isn’t a typical day in the studio. Sometimes I’m painting a commission, often of a dog. Sometimes I’m cutting a piece of Lino. I teach 5 days a week so I’m generally in my studio between 6 and 9 pm on weekdays. Then most of Saturday and Sunday. I do get very good holidays so I’m always in the studio then.
How long have you been printmaking?
I made my first print when I was 13. It was a reduction Linocut of a volcano. It was hideous. It cured me of printing for many years. I seriously started printing in the early 90s where I used Lino for several years. I had a break from printing until 2014. That’s when a friend encouraged me to put a print in the RA summer show. My print of Princess changed my life. I sold 74 copies and it opened lots of doors to me.
What inspires you?
I’m a huge fan of the real world. I love nature. I’m fascinated by plants and animals. I use the internet and regularly raid Instagram for imagery. I visit
exhibitions as I live in London. I find though that my inspiration really comes when I’m making something. No point in waiting for the next great idea. Just get on and the ideas come…….. it’s never let me down yet!!
What is your favourite printmaking product?
One of the things that has really transformed my practice is Pfeil tools and also good quality rollers. Couldn’t be without papers too. Purcell Papers are my church…….
What have you made that you are most proud of?
I’m proud of most of the things I make. There are always things I keep that I don’t want to sell. Seeing my card in the RA shop was a big thrill and all
the red dots on the print too.
Where can we see your work? Where do you sell?
I sell directly from my studio in Wimbledon Arts Studios. We have an open studio exhibition twice a year. Next one is 15th to 18th of November. I also
sell through my website ianmowforth.com
People generally get in touch to ask me to paint their dogs. It’s what I’m more known for these days ……
What will we be seeing from you next?
I’m doing quite a lot of painting at the moment inspired by Great Dixter garden in Northiam. I’m also going to make some much larger scale Linocuts of dogs and other animals. They’ll be printed on to paper and fabric and stretched on to canvas stretchers.
Do you have any advice for other printmakers and creatives?
My advice would be to find a medium/s that you feel comfortable with. Try not to master too many techniques at once. All Printmaking processes take a while to become fluent in. Also, buy the best materials that you can afford as they do make a huge difference to your learning experience.
If you’re a Halloween lover this project is for you! We’ve had a go with Speedball’s Acrylic Night Glo Ink and made our own glow in the dark Halloween poster. This ink really gives your prints a twist
– it would be great for children’s (or adults’!) bedrooms too.
This project uses paper stencils to create a two layered print on paper.
Start by drawing the designs onto copy paper – we’re using A3 80gsm paper. 80gsm is perfect for paper stencils. It’s thin enough to give crisp edges but
thick enough to withstand a good number of prints.
Both masks and stencils can be used for screen printing. This first layer is made up of masks – a solid shape that blocks out the ink, leaving white areas.
Our next layer will be a stencil – a solid piece of paper with holes cut out to let the ink through.
A hinged board is very helpful when screen printing onto paper. Hinge clamps are attached to a board, a screen is held in place, allowing you to lift it up to place your paper. The screen will
go down in the same place every time.
Tape the edges of the screen with parcel tape on the front and back. If using masks, you’ll need to tape an aperture that will let the ink through. A right angle ruler can be useful to get this
square. We’re using an A3 screen with 90T mesh. After the screen is taped, attach it to the hinge clamps.
Place a piece of paper on the board and then place the first stencil or mask on top. Use masking tape to mark where the corners of the paper will go each
time a print is taken.
Make sure the whole design fits in the aperture.
When you’re happy with the position, scoop a line of acrylic screen printing ink along the top edge of the screen.
Hold the screen slightly up and away from the board. Use a squeegee at a 45 degree angle to lightly drag the ink down the screen – this is called flooding the screen. Place the screen down
onto the board and pull the squeegee down the screen again, this time with no extra ink. Push hard. You’ll know you’ve printed the entire design when
no areas appear shiny. If they are, pull the squeegee down the screen again, pressing hard.
Lift the screen to reveal a print.
Place the print to one side and lay down another piece of paper. It’s important to work quickly and not let any ink dry in the mesh. To flood the screen
with ink, lift the screen slightly and push the ink back up the screen with the squeegee. Print again by placing the screen down and pulling the squeegee
hard down the mesh again. Continue for the whole edition.
When the edition is finished, peel the paper stencils from the mesh. Use a spatula to scoop off any excess ink back into the pot. Use a soft sponge and
a bucket of cold water to gently clean the mesh to remove any ink. Let the screen dry. Leave the screen in the hinge clamps ready for the next layer.
Layer two of our design is printed in Speedball Acrylic Night Glo Ink.
This ink is a very pale, milky green colour that shows up very slightly on white paper but glows in the dark!
Place a print back onto the board using the masking tape corners to get it into position. Place the next stencil on top. You should be able to see the
first layer through slightly to help place the second layer.
Scoop some ink onto the screen in a line slightly wider than the design.
As before, flood the screen and then press firmly with the squeegee to print. It may be necessary to pull the squeegee down the screen a couple of times
to get a clear, solid print with the Night Glo ink.
The Night Glo print will be very subtle on the paper. It may show up more on darker areas than on the white (see the dots in the eyes).
The print should glow in the dark!
(Note how the dots in the eyes do not glow as much as they were printed onto a dark ground.)


.jpg)


.jpg)


