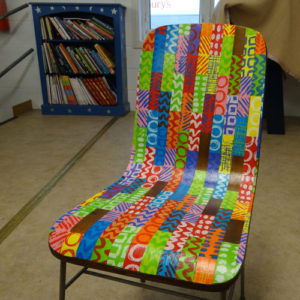
We’re really getting stuck into using our new Ready-Made Thermofaxes.
Two weeks ago we showed you how we used some of them to print patterned papers in bright colours to make all the pieces seen here:


We printed a big stack of these papers using six of the Ready-Made Thermofax designs. We then used these papers to make a découpage chair! Here’s how we made it:
We cut a 3 x 10cm template from a piece of plastic and used it to cut up our papers into rectangles.

A while ago we got hold of two vintage chairs. We used the first to create this Block Printed Chair and now we’re ready to use the second!

Using Mod Podge we began to glue the pieces in a line down the centre
of the chair.

We used a foam brush to spread a slightly watered down Mod Podge over the surface of the chair and then over the top of the paper, one piece at a time.


We overlapped the edges of our chair to be trimmed later and left a few gaps in the pattern where the wood can be seen.

When the glue was dry (we waited overnight) we used a scalpel to trim the edges of the overlapping pieces.

The surface was then covered in another layer of Mod Podge.


The glue dried overnight to a clear finish, leaving us with a bright, print-covered chair!

To have a go with Thermofax printing yourself, take a look at our
Ready-Made designs or
make your own! See how the designs
were printed in our Blog Post.

